
Microwave Drawer Installation Guide (2026): Flush vs Proud Mount
You finally did it. You decided to clear the clutter off your countertops and invest in a high-end appliance for your kitchen island. You read our ultimate Microwave Drawer vs Countertop Comparison, pulled out your credit card, and ordered a beautiful, $1,200 stainless steel drawer.
But now, a massive box has arrived at your door, and reality is setting in: How exactly do you install a microwave drawer without ruining your expensive custom cabinets?
Unlike a standard countertop model that you simply plug into a wall, a microwave drawer requires precise carpentry, specific electrical placement, and a fundamental understanding of how these powerful machines vent heat. Whether you are a confident DIYer tackling a weekend kitchen remodel or a homeowner trying to make sure your contractor gets the job done right, this comprehensive microwave drawer installation guide will walk you through the exact requirements, dimensions, and hidden secrets to achieving a flawless, magazine-worthy finish in 2026.
Quick Installation Overview
Installing a microwave drawer requires three major phases: Electrical preparation (a dedicated 120V/15A circuit with the outlet placed in the top left corner or an adjacent cabinet), Cabinet modification (building a sturdy, 100+ lb support base and deciding between a standard “proud” mount or a recessed “flush” mount), and Safety securing (installing the crucial anti-tip block and mounting flanges). A flush mount looks perfectly seamless but requires complex multi-tiered carpentry and a mandatory flush-mount deflector vent to prevent heat damage to your cabinetry.
The Most Important Decision: Proud vs. Flush Mount
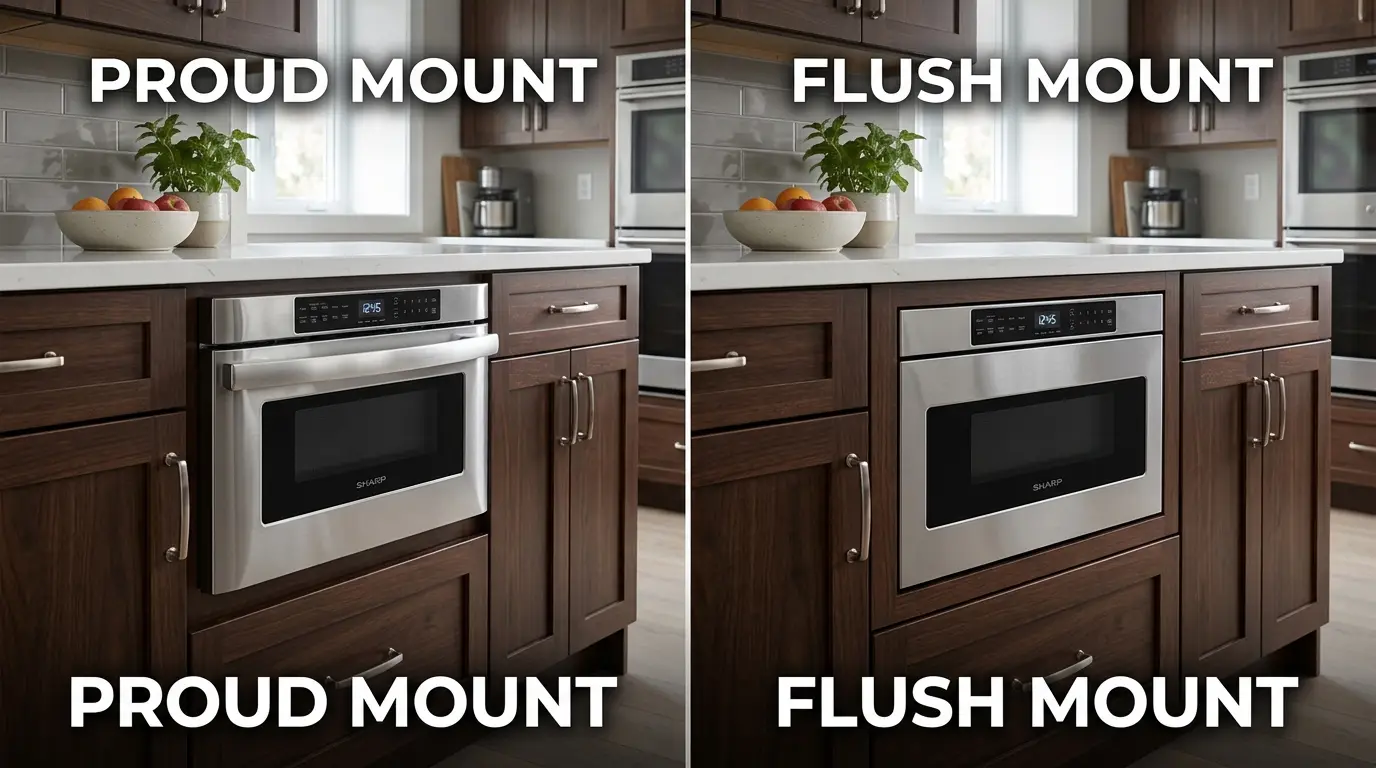
Before you even touch a tape measure or a saw, you must decide how you want the front face of the microwave to sit against your cabinets. This single decision changes the entire installation process, the dimensions of the cutout, and the accessories you need to purchase.
1. The “Proud” Mount (Standard Installation)
In a proud mount, the stainless steel face of the microwave drawer sits slightly “proud” (protruding out) from the surface of your cabinet doors, usually overlapping the wood by about an inch. The body of the microwave rests inside the cabinet, but the control panel and front bezel rest on the outside of the frame.
- Pros: This is the easiest, most forgiving, and most common installation method. It requires a standard rectangular cutout. Because the vent is exposed on the protruding front face, you do not need to buy any extra venting accessories to direct the airflow.
- Cons: It doesn’t look quite as seamless and integrated as a flush mount. From a side profile, you will clearly see the appliance sticking out from the island.
2. The “Flush” Mount (Luxury Installation)
In a flush mount, the front face of the microwave drawer is recessed so that it sits perfectly level and flat (coplanar) with your surrounding cabinet doors. You can run your hand across the cabinet face and the microwave without feeling a bump.
- Pros: It looks incredibly premium, custom, and visually flawless. This is the modern, architectural aesthetic most people want when they invest thousands of dollars in a high-end kitchen island or custom base cabinetry.
- Cons: It is significantly harder to install. The cabinet maker must create a specialized, multi-tiered cutout with cleats set back exactly 3/4″ or 1″ depending on the door thickness. More importantly, because the front vents are now buried inside the wood frame, you must install a separate Flush Mount Deflector Vent to safely route the exhaust air away from the wood.
Pre-Installation: Electrical Requirements
Microwave drawers are powerful, high-draw appliances. You cannot just run an extension cord to a random outlet or splice into existing lighting wires. Here is exactly what your electrician needs to know before the drywall goes up or the cabinets are set in place:
- Dedicated Circuit: The drawer requires a dedicated 120-Volt, 60 Hz, 15-amp or 20-amp electrical supply. This is a strict code requirement. It cannot share a breaker with your refrigerator, your dishwasher, or your garbage disposal. When the magnetron fires up, it causes a surge that will trip a shared breaker instantly.
- Outlet Placement (The Common Trap): This is where most DIYers and even some professional contractors make a critical mistake. The electrical outlet cannot be located directly behind the microwave drawer. The appliance chassis is so deep that the plug itself will prevent the microwave from sliding all the way flush into the cabinet.
The Sweet Spot for the Outlet
The standard 3-prong grounding outlet should be installed in the top left corner of the cutout space (recessed deeply into the back wall), or ideally, in an adjacent cabinet where the cord can be safely routed through a small 1.5-inch hole. Because the power cord on the unit is usually located on the top right (when looking from the back), routing it to the top left prevents the cord from getting bunched up behind the heavy metal chassis. Always check the specific installation template provided by brands like Sharp or Bosch to verify the “Safe Zone” for electrical placement.
Step-by-Step Microwave Drawer Installation

Disclaimer: Always refer to the exact manufacturer’s manual included with your specific model, as dimensions vary slightly between a 24-inch and a 30-inch trim kit. The following steps outline the universal process for setting the unit safely.
Step 1: Prep the Cabinet Cutout
If you are doing a standard proud mount for a 24-inch drawer, your contractor will need to create a perfectly square, reinforced box inside your base cabinetry.
- The typical opening for a standard 24-inch unit is 22 1/8 inches wide, 14 13/16 inches high, and requires a minimum depth of 23 1/2 inches.
- Crucial Support: The floor of the cutout must be solid 3/4-inch plywood or solid wood framing, capable of supporting at least 100 pounds. Microwave drawers are incredibly heavy (averaging 70-85 lbs empty). Do not attempt to install the drawer on a flimsy, hollow cabinet base or thin MDF shelving; it will bow and eventually collapse.
Step 2: Install the Anti-Tip Block
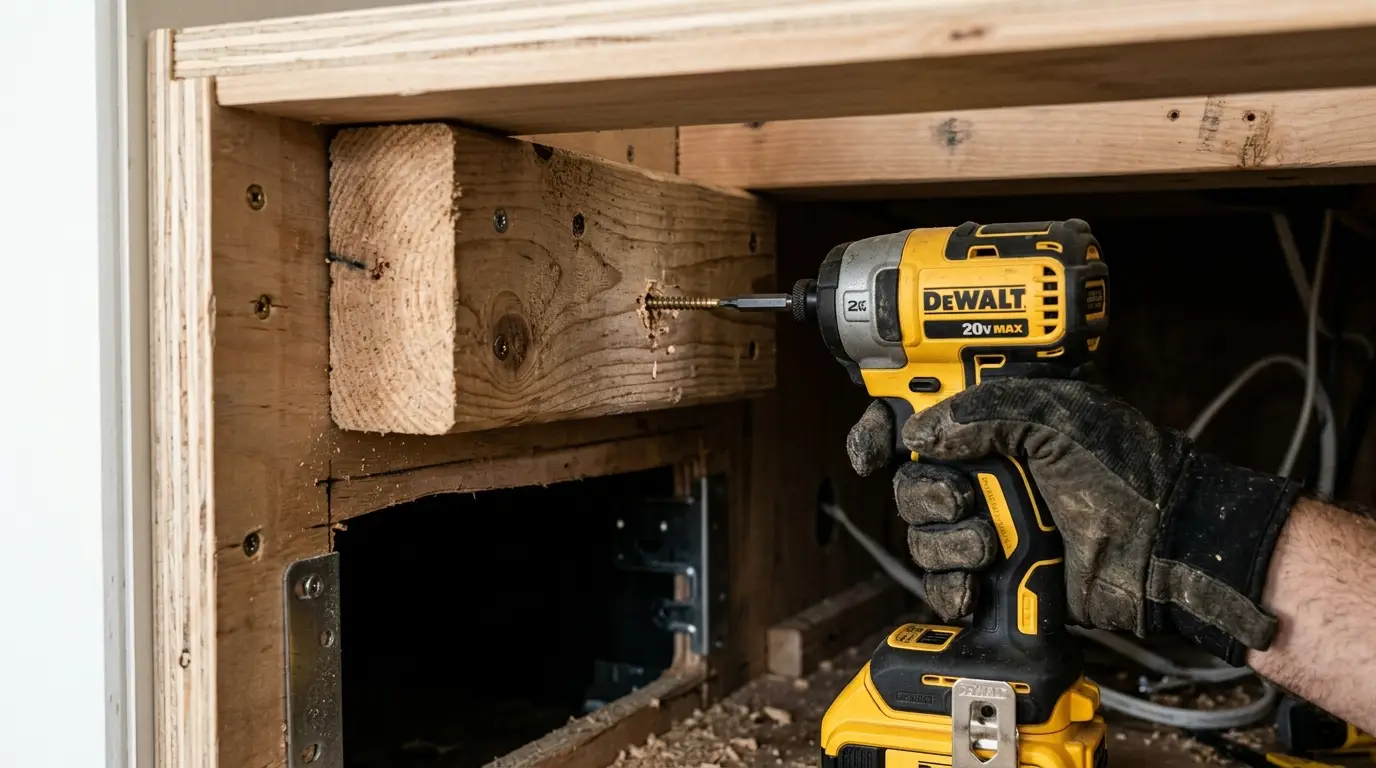
This is the most frequently skipped step, and it is a massive safety hazard. Think about the physics: when a microwave drawer is fully extended outward and loaded with a heavy glass casserole dish filled with hot soup, the center of gravity shifts drastically. The entire appliance wants to lever forward and tip out of the cabinet.
You must install a solid wood Anti-Tip Block (usually a piece of 2×4 cut to size) securely screwed into the top-left rear corner of the cabinet cutout. When the microwave is pushed back into the cabinet, the rear chassis will slide right under this block. This physical barrier prevents the back of the unit from lifting up, ensuring the drawer cannot tip forward when opened.
Step 3: Attach the Flush Mount Deflector (If Applicable)
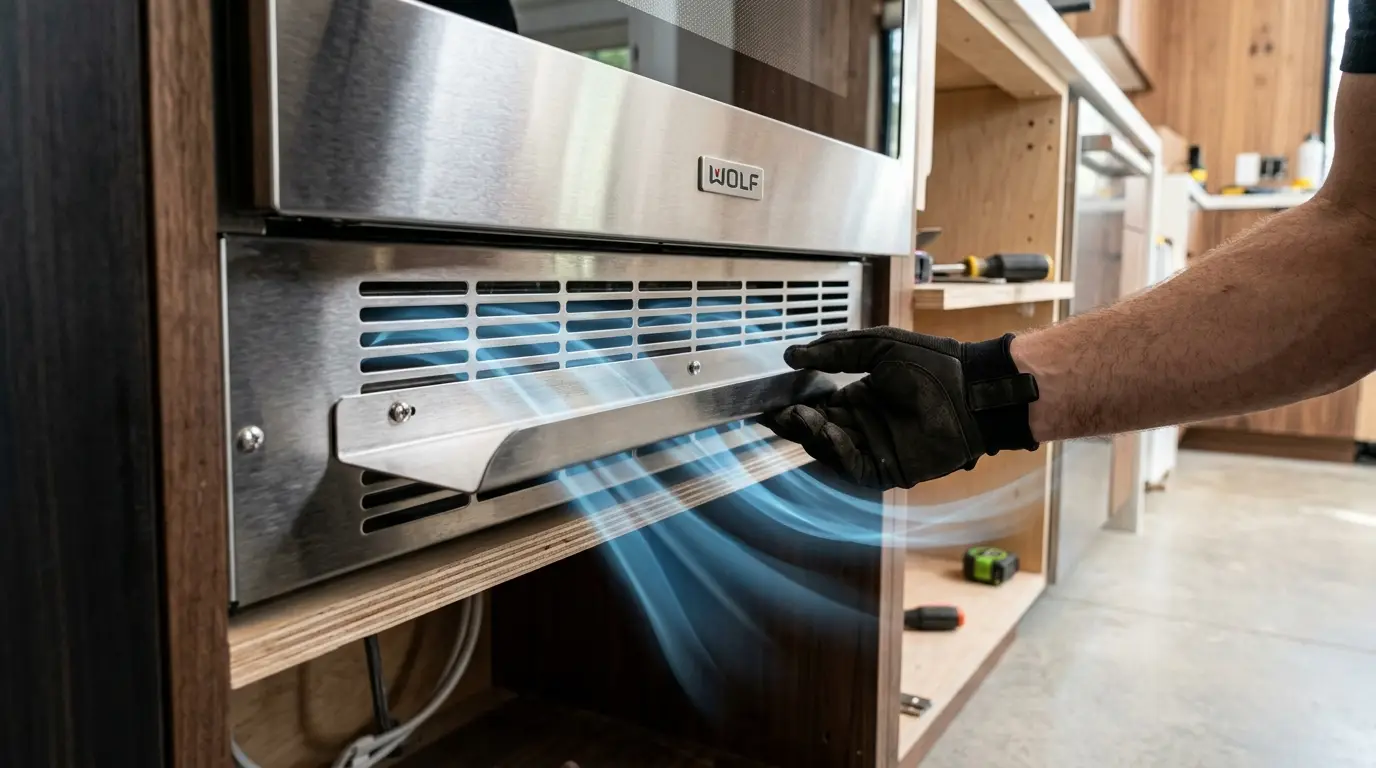
If you chose the luxury flush mount route, you must install the metal deflector vent now, before the microwave goes into the wall. Because the microwave is pushed an inch deeper into the cabinet, the standard intake and exhaust vents on the face of the machine are blocked by wood. The deflector accessory catches the hot exhaust air and safely deflects it down and out of the narrow front gap. Without this, your wooden cabinets will trap heat, warp, peel their veneer, or potentially catch fire, voiding your warranty entirely.
Step 4: Slide, Plug, and Secure
Because of the weight and the tight tolerances, this step requires two people.
- Place the drawer on a stable lifting cart or have two people hold it right in front of the cabinet opening.
- Route the electrical cord through your designated access hole and plug it securely into the dedicated 120V outlet.
- Carefully lift the microwave and slide it horizontally into the cabinet cutout. Go slowly. Make sure the power cord is not pinched underneath or behind the heavy metal chassis.
- Push the unit straight back until the front mounting flanges are sitting completely flush against the cabinet wood (or the recess cleats).
- Open the drawer carefully to expose the front frame. Locate the four mounting holes on the internal flanges. Drive the four supplied wood screws through the flanges directly into your cabinet wood to secure the appliance permanently to the island.
Common Installation Mistakes to Avoid
Even seasoned general contractors can make critical errors when installing specialty built-in appliances. Watch out for these major red flags during your renovation:
- ❌ Pinching the Cord: If the drawer doesn’t sit perfectly flat or resists being pushed all the way back, do not force it! Pull it out and check the power cord. A pinched cord caught beneath the 80lb chassis will quickly strip its insulation and become a severe fire hazard.
- ❌ Ignoring Clearances: Manufacturer guidelines clearly state you must leave a minimum of 36 inches of clearance from the floor to the bottom of the microwave drawer (in higher wall installations) or adhere to standard 36-inch counter heights for islands. Installing it too low negates the ergonomic benefits, while installing it too high makes looking down into the drawer impossible.
- ❌ Installing Under a Sink: Never, under any circumstances, install a microwave drawer directly under a sink, a primary wet prep area, or a built-in coffee maker. If water cascades down the front of the cabinets, it will easily seep into the sensitive digital control panel and capacitive touch matrix, destroying the motherboard instantly.
Explore More Appliance Guides
Don’t stop here! Visit our complete hub for more expert tips, side-by-side equipment comparisons, and updated buying recommendations for 2026.
FAQ: Microwave Drawer Installation & Dimensions
2026 Guide: Specs, Cutouts, and Electrical Requirements
Installation Pro Tip: Always test the drawer’s opening and closing mechanism before completely fastening the mounting screws to the cabinet face.
