
How to Vacuum Seal Seeds for Long Term Storage and Germination (2026 Guide)
Whether you are a dedicated homesteader building an emergency survival cache, a rare heirloom tomato enthusiast preserving generations of careful cross-breeding, or just a frugal backyard gardener tired of buying expensive new commercial packets every single spring, learning how to properly preserve your harvested seeds is an absolutely vital survival and agricultural skill.
You must understand one fundamental biological truth: A seed is not a dead, inanimate object. It is a living, breathing organism existing in a fragile state of suspended animation. If you carelessly toss a paper packet of seeds into a hot, humid garage, the ambient moisture and heat will trigger the seed to prematurely consume its own internal energy reserves, causing it to quietly exhaust itself and die within a single season.
To achieve true long-term storage—we are talking 5, 10, or even 50 years of viable germination—you must completely halt the biological clock. Vacuum sealing is the ultimate, scientifically proven way to achieve this. However, if you seal a seed incorrectly, you will accidentally suffocate it, crush it, or cause it to rot. In this comprehensive guide, we break down the exact science of vacuum sealing seeds for decades-long viability. For a complete look at all our preservation techniques, visit The Ultimate Vacuum Sealing Hub: Food Storage, Sous Vide, Mason Jars & Buying Guides (2026).
The Quick Answer
To store seeds for decades, you must protect them from moisture, oxygen, and heat. First, seeds must be completely bone-dry (using the “Snap Test” and silica gel packets). Once dry, vacuum seal them in a rigid Glass Mason Jar (to prevent the atmospheric pressure from physically crushing fragile seeds like tomatoes) or carefully use the manual “Pulse” method with plastic bags for hard seeds like corn. Finally, store the sealed container in a deep freezer (0°F). Always let frozen seeds thaw unopened at room temperature for 24 hours to prevent condensation from ruining them.
I. The Enemies of Germination: Moisture, Oxygen, and Heat
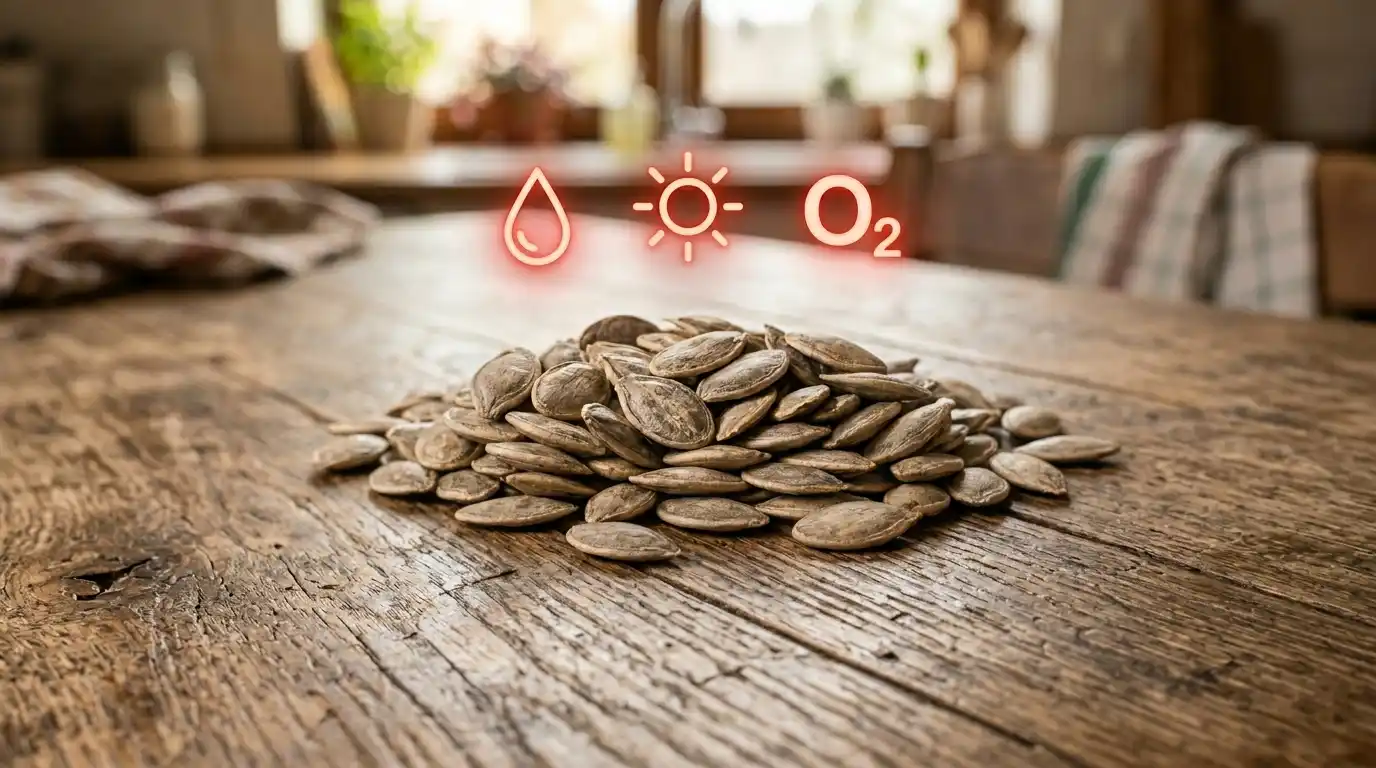
To successfully store a seed for years on end, you have to understand the triggers that cause it to wake up. A seed contains an embryo and a finite food supply (the endosperm) wrapped in a protective coat. During storage, you must aggressively protect it from the three environmental elements that stimulate its metabolism.
1. Moisture (The #1 Killer)
This is the absolute most lethal enemy of stored seeds. High ambient humidity triggers the seed to undergo imbibition (absorbing water to sprout). If the seed absorbs moisture but is not planted, it will simply rot in the bag. Furthermore, excess moisture encourages rapid, toxic mold and fungal growth that destroys the seed coat.
2. Oxygen (Cellular Respiration)
Seeds naturally respire (breathe) at a microscopic level. High oxygen environments force them to burn through their stored energy much faster. Additionally, oxygen causes lipid oxidation, breaking down the essential fats and oils inside the seed, rendering it completely unviable over a few short years.
3. Heat (Metabolic Acceleration)
Warm temperatures act as a massive catalyst, accelerating the seed’s metabolic rate and degrading its vital internal enzymes. A general agricultural rule of thumb states that for every 10°F drop in storage temperature, the viable shelf life of the seed effectively doubles.
The Anaerobic Danger of Vacuum Sealing Wet Seeds
Vacuum sealing flawlessly solves the oxygen problem by creating an airtight, zero-atmosphere environment. However, if you vacuum seal a seed that still has high internal moisture, you will accidentally create an anaerobic (oxygen-free but wet) environment. This is where deadly botulism and highly destructive anaerobic mold strains thrive.
This is the exact same biological hazard and fatal mistake we sternly warn against in our culinary safety guide: Foods You Should Never Vacuum Seal.
II. The Crucial Step: Drying Your Seeds
Because of the anaerobic dangers mentioned above, a seed must be completely, utterly bone-dry before it ever touches a vacuum bag or glass jar. Freshly harvested seeds (especially from wet, fleshy vegetables like pumpkins, cucumbers, or tomatoes) contain far too much inherent water for immediate storage.
1. The Air-Dry Method
After cleaning the pulp off your harvested seeds, spread them out in a single, sparse layer on a paper plate, a window screen, or a coffee filter. (Do not use regular paper towels, as the wet seeds will permanently glue themselves to the paper).
Place them in a cool, highly ventilated room (ideally with a ceiling fan running) away from direct, harsh sunlight. Let them passively air-dry for at least 1 to 2 full weeks depending on the ambient humidity of your region.
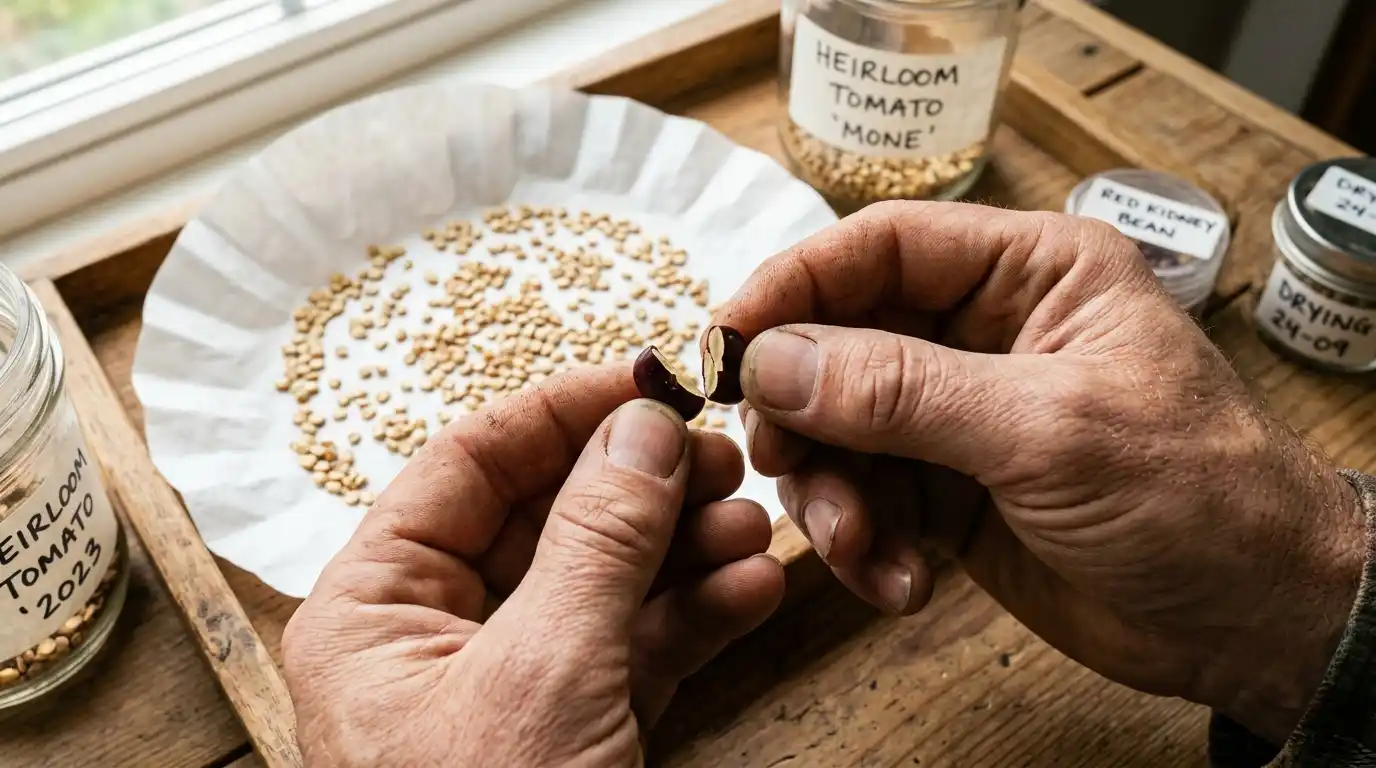
2. The “Snap Test”
How do you mathematically know when they are ready for the vacuum sealer? You must perform the Snap Test on a sacrificial seed.
Try to bend a large seed (like a bean, pea, or pumpkin seed) directly in half with your fingers. If it bends, yields, or feels slightly soft and rubbery, it still holds internal water. If it cleanly, violently snaps in half with an audible crack, it is perfectly dry and ready for the vault.
3. The Silica Gel Hack (Ultimate Insurance)
If you live in a highly humid climate (like Florida or Louisiana), passive air-drying might never achieve the perfect brittle snap. For absolute insurance, place your air-dried seeds into a sealed Tupperware container with color-indicating silica gel desiccant packets for 48 hours before you vacuum seal them.
Silica gel aggressively pulls invisible water vapor out of the air. It will extract any lingering, microscopic residual moisture from the deep core of the seeds, rendering them flawlessly dry and perfectly prepared for the freezer.
III. Storage Vessels: Plastic Bags vs. Mason Jars
Once your seeds are successfully dried, you must carefully choose your preservation vessel. Not all seeds can handle the intense, violent physics of a vacuum sealer machine.
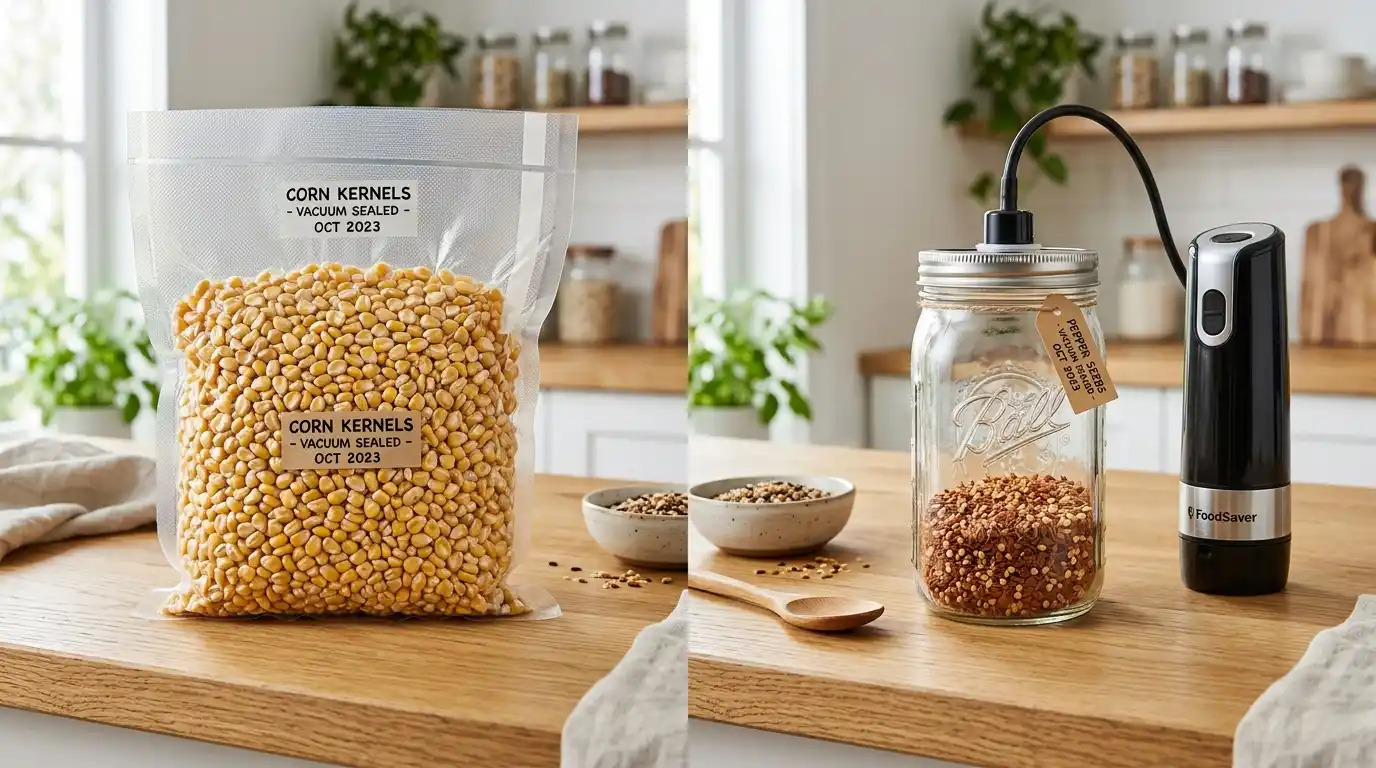
1. Vacuum Sealing in Plastic Bags
Standard, textured plastic vacuum bags are excellent for massive, incredibly hard seeds like corn kernels, beans, and peas that have dense, armored outer coats.
The Crushing Hazard: However, if you are attempting to store highly delicate, paper-thin seeds (like tomato, pepper, or tiny carrot seeds), the intense atmospheric pressure of an external suction machine will literally crush them into dust.
If you insist on using plastic bags for fragile seeds, you absolutely must use the manual “Pulse” override method. We outline this exact delicate technique in our guide on How to Vacuum Seal Delicate Fruits for Smoothies Without Crushing, which teaches you how to stop the motorized suction just a fraction of a second before the seeds are compressed.
2. Vacuum Sealing in Mason Jars (The Superior Method)
This is the undisputed, absolute best method for storing all types of agricultural seeds. A rigid, heavy-duty glass Mason jar takes the full, brutal brunt of the atmospheric room pressure, completely protecting the fragile, delicate seeds resting safely inside. You can achieve a profound, 100% zero-oxygen environment without a single seed ever being touched or squeezed.
Furthermore, using a glass jar allows you to toss a rechargeable orange silica gel packet right into the jar alongside the seeds for permanent, decade-long humidity control.
To learn exactly how to extract the air from these glass jars flawlessly without having to drag out a massive, bulky countertop machine, read our highly rated hardware guide: 7 Best Electric Mason Jar Vacuum Sealers in 2026: Tested & Reviewed.
IV. The Deep Freeze (Maximizing Shelf Life)
Once your seeds are bone-dry and perfectly vacuum-sealed in a glass jar, you have to control the final enemy: ambient temperature.
Room Temperature Storage
A vacuum-sealed glass jar of dry seeds kept in a totally dark, moderately cool basement pantry or root cellar (consistently around 60°F) will easily maintain incredibly high germination rates for 3 to 5 years. This is perfect for the casual backyard gardener rotating crops.
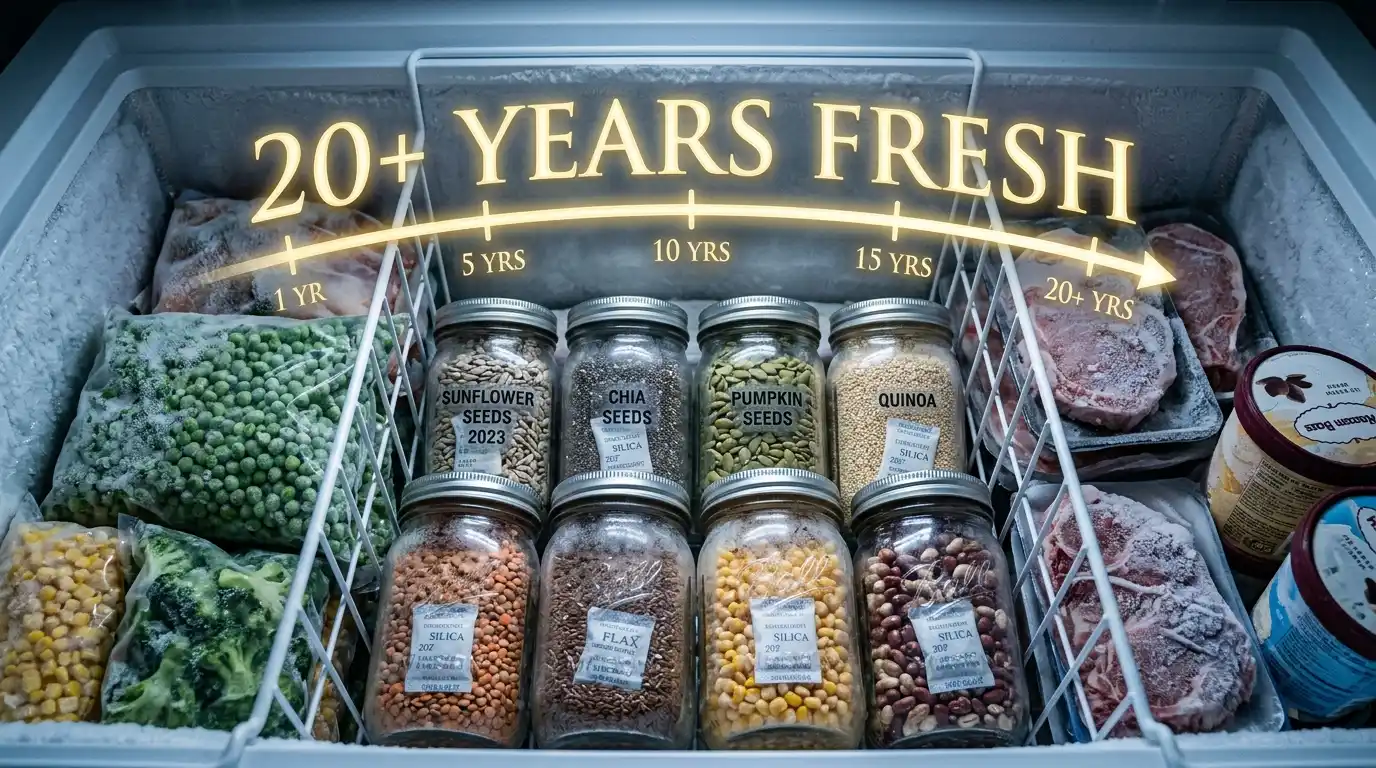
The Deep Freeze (The Seed Vault)
If you place that same vacuum-sealed jar into a dedicated chest freezer (kept at a highly stable 0°F or colder), you effectively freeze time and stop the biological clock entirely. This is the exact same thermodynamic logic used by the famous Svalbard Global Seed Vault in Norway. Properly dried and sealed seeds can remain viable in a deep freeze for 10, 20, or even 50+ years.
If you skipped the meticulous drying steps detailed in Section II and hastily threw slightly damp seeds into the freezer, you have doomed them. The residual water hidden inside the seed coat will turn into expanding, jagged ice crystals in the freezer, instantly destroying the plant’s microscopic cell walls and killing the seed embryo forever.
V. How to Safely Thaw and Germinate (Preventing Condensation)
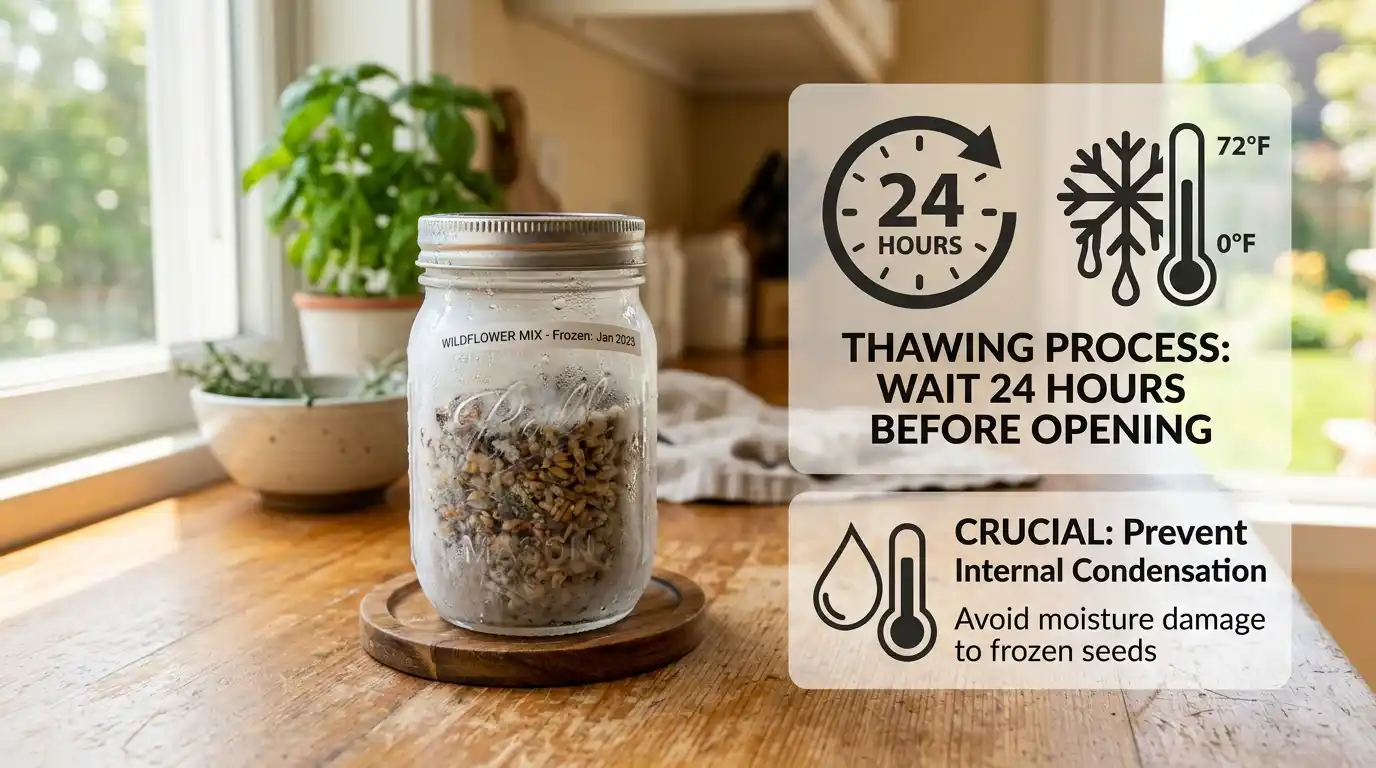
When the spring season finally arrives and you are ready to begin planting your seedlings, you cannot simply pull the freezing cold jar of seeds out of the deep freeze, instantly pop the metal lid, and start grabbing seeds.
If you open a freezing cold 0°F jar in a warm, humid room or greenhouse, a massive wave of condensation will instantly form on the inside of the glass and directly on the surface of your seeds. This sudden blast of wet condensation will ruin the viability of any seeds you do not immediately plant and intend to put back into the freezer.
The Mandatory 24-Hour Thawing Rule:
Take your vacuum-sealed glass jar or plastic bag out of the freezer and set it on your kitchen counter. Do not break the vacuum seal or open the lid.
Let the sealed, airtight container sit entirely undisturbed at room temperature for a full 24 hours until the seeds inside have completely acclimatized to the ambient room temperature. Because they are safely protected in an airtight vacuum environment while they warm up, condensation physically cannot form. Only after they are fully room temperature is it safe to break the seal, open the jar, and confidently handle your viable seeds.
Explore the Vacuum Sealing Hub
Don’t stop here! Dive deeper into the science of preservation, explore head-to-head machine comparisons, and read our latest hardware reviews for 2026.
FAQ: Vacuum Sealing Seeds
2026 Guide: Long-Term Storage, Germination & Protection
Storage Tip: For maximum longevity, keep your vacuum-sealed seed jars in a cool, dark place. The crisper drawer of your refrigerator is the perfect environment!
