
How to Prevent Condensation in a Film Storage Fridge (2026 Archival Guide)
Shooting analog film in 2026 is a beautiful, deeply rewarding, and incredibly expensive passion. Between the skyrocketing retail cost of modern 35mm and medium format stocks, and the sheer rarity of hoarding long-discontinued emulsions like Fuji Pro 400H or Kodak Aerochrome, analog photographers treat their film stashes like liquid gold.
To prevent the delicate chemical layers in the emulsion from degrading, losing ISO sensitivity, or experiencing massive color shifts over time, storing your film in a cold, dark environment is absolutely mandatory. However, when you dedicate a standard mini fridge to act as your personal film vault, you introduce a massive, silent new threat to your archive: moisture.
Liquid water and photographic emulsion are mortal enemies. The biggest battle analog photographers face isn’t maintaining temperature; it is mastering strict humidity control. In this comprehensive archival guide, we break down the physics of why your fridge sweats, exactly how to prevent condensation from ruining your expensive film, and the golden rules for safely thawing your rolls before your next big shoot.
The Quick Answer
Never place bare film canisters directly onto a fridge shelf. To prevent condensation damage, you must seal your film inside airtight, gasket-locking Tupperware or heavy-duty freezer bags with the excess air squeezed out. You must place reusable, color-indicating silica gel packets inside those containers to absorb trapped moisture. Finally, to prevent “shock condensation” from instantly ruining the emulsion, you must let the sealed container thaw at room temperature for 2 to 3 hours before opening it to load your camera.
I. Why Condensation Happens in Your Film Fridge
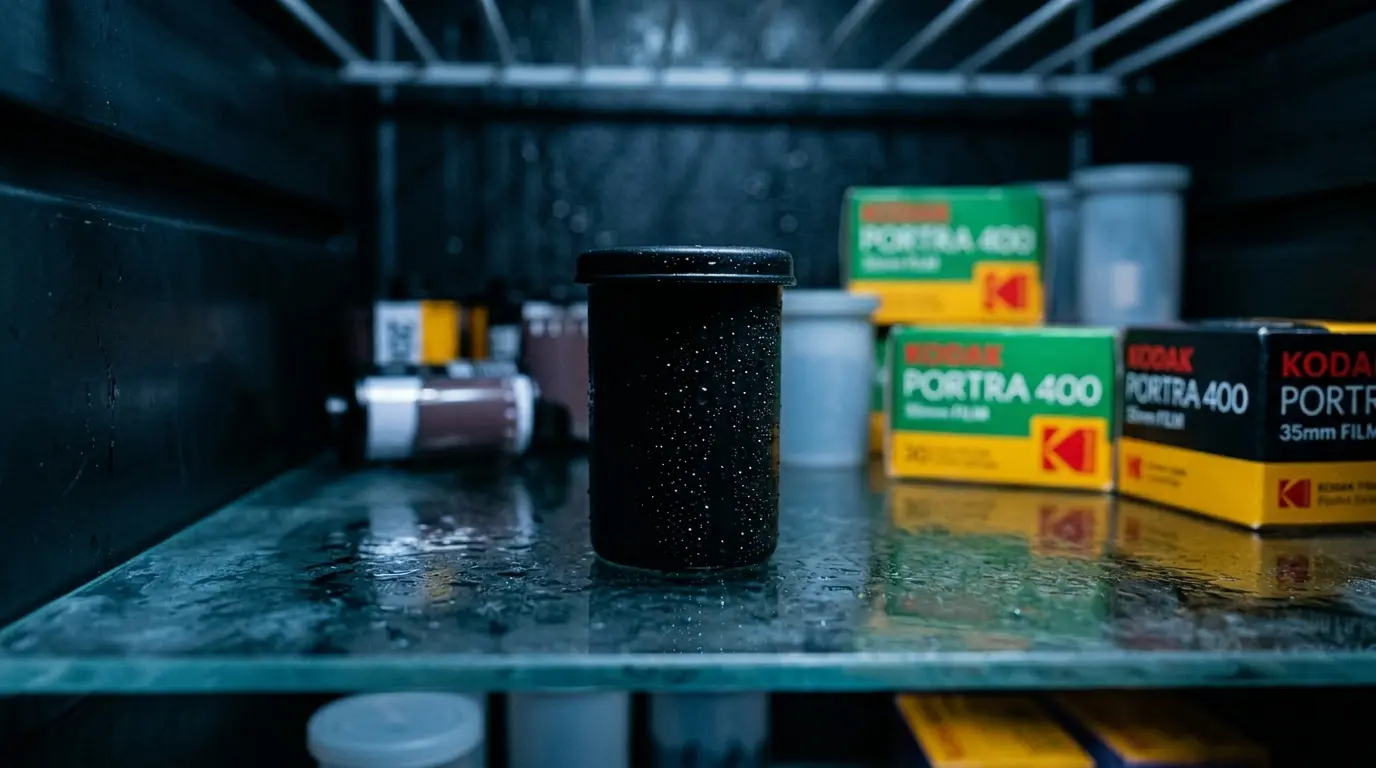
Condensation is not a sign of a broken refrigerator; it is an unavoidable result of simple thermal physics. Your fridge is not creating water out of thin air; it is pulling invisible water vapor directly out of the ambient environment.
When you open the fridge door to grab a fresh roll of Kodak Portra 400 or Ilford HP5, a massive wave of warm, humid room air violently rushes into the cold interior cavity. When this warm air hits the freezing plastic walls of the fridge (or your chilled film boxes), the air temperature drops rapidly. Cold air physically cannot hold as much moisture as warm air. The sudden temperature drop forces the air below its “dew point,” causing the invisible vapor to instantly condense into physical liquid water droplets.
The Catastrophic Danger to Photographic Emulsion
Film emulsion is primarily composed of light-sensitive silver halides suspended in a layer of organic gelatin (an animal byproduct). Gelatin is highly hydrophilic—it desperately wants to absorb water. If condensation forms inside your film canister:
- Emulsion Tearing: The damp gelatin layers will stick together inside the tightly wound 35mm cartridge. When you try to advance the film lever on your camera, the sticky emulsion will literally tear itself off the acetate base.
- Mold Growth: Because gelatin is organic, a damp roll of film placed back into a dark, warm camera bag becomes the ultimate breeding ground for actual, fuzzy mold and fungus, destroying your images permanently.
- 120 Backing Paper Fusing: Medium format (120) film does not have a protective metal cartridge; it is tightly wrapped in backing paper. If condensation forms, the paper will fuse directly to the negative. Furthermore, the black ink from the frame numbers on the paper will transfer onto the emulsion, causing a permanent defect known as “mottling.”
II. The First Line of Defense: Airtight Sealing

You should absolutely never put naked rolls of 120 film, cardboard pro-packs, or even standard 35mm plastic canisters directly onto a bare fridge shelf. Standard plastic film canisters are not perfectly waterproof or airtight. They “breathe” with temperature fluctuations.
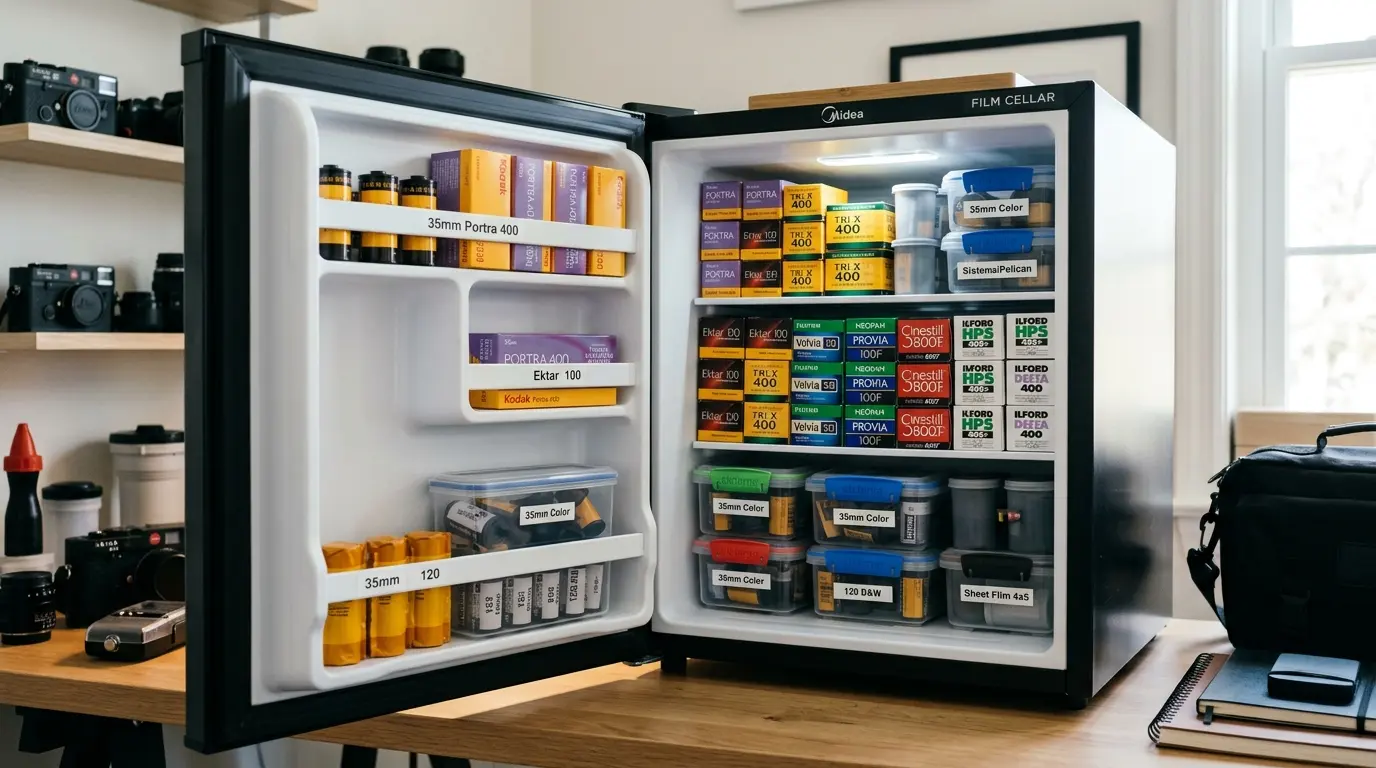
Group your film by ISO, format, or brand, and place them inside high-quality, rigid food storage containers that feature a thick, locking silicone or rubber gasket. This creates a physical, impenetrable barrier against the humid air rushing into the fridge. To find the exact dimensions you need, browse our roundup of the Best Airtight Film Storage Boxes.
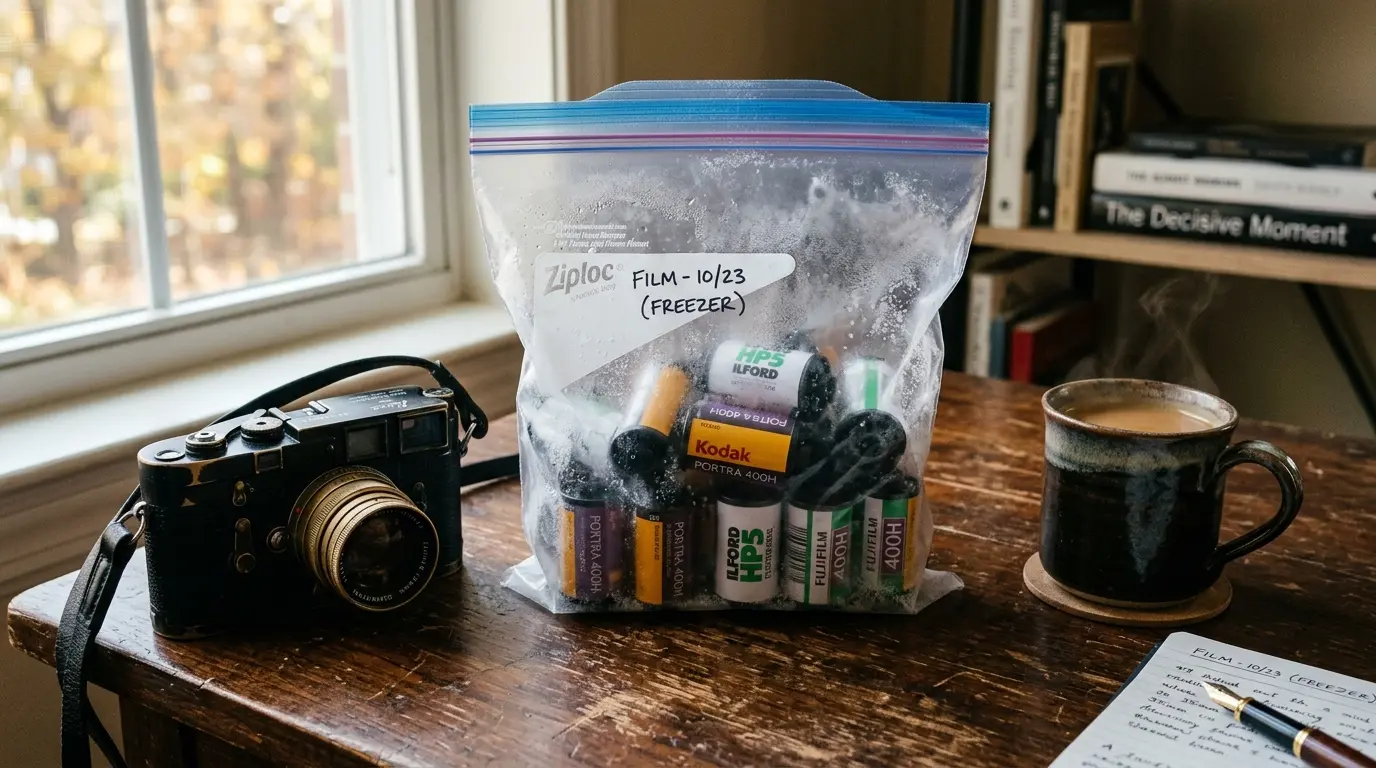
If you are tight on internal shelf space, or if you prefer to freeze your film for decade-long deep storage, heavy-duty Zip-Loc freezer bags work perfectly. They are cheap, reliable, and conform to the shape of your stash.
Before locking the latches on your Tupperware or zipping your freezer bag closed, you must aggressively squeeze as much ambient room air out of the container as physically possible. Less air inside the bag means less ambient moisture trapped inside with your film.
III. Desiccant Silica Gel (The Ultimate Moisture Killer)
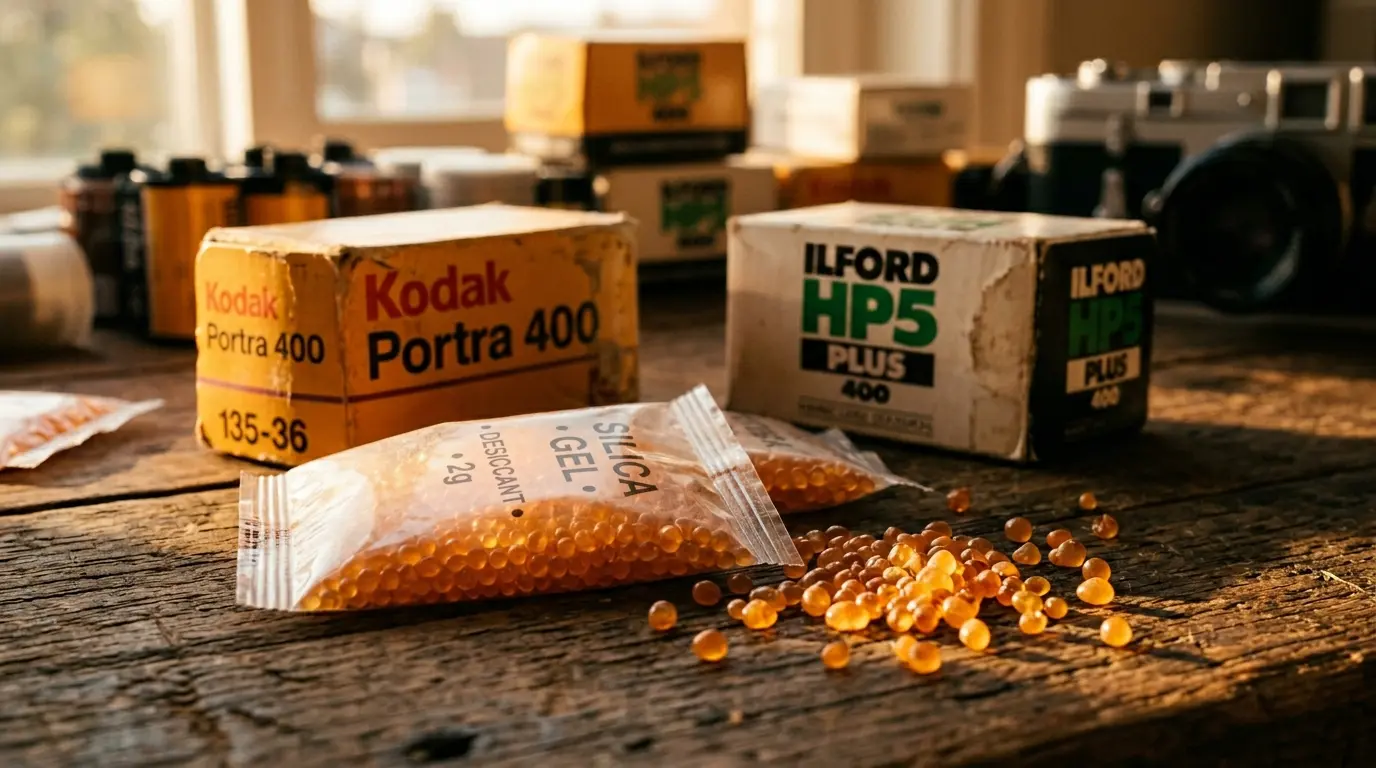
Airtight containers only perform half the job: they protect the film from new moisture entering the fridge. However, you still have to deal with the ambient humidity that was trapped inside the container the exact moment you sealed it in your bedroom or studio.
Insert Silica Packets into Every Box
Place a few desiccant silica gel packets directly inside the Tupperware or freezer bag alongside your film. Silica gel is a highly porous synthetic material that aggressively pulls and absorbs water vapor directly out of the air. By placing it inside the sealed box, the silica will rapidly absorb any trapped ambient moisture, ensuring the micro-climate touching your cardboard boxes and plastic canisters remains permanently, safely bone-dry.
The Secret Weapon: Color-Changing Indicating Beads
Do not use the generic, white, opaque “Do Not Eat” packets that come inside shoe boxes, as you have no idea when they are full of water and have stopped working.
The absolute best investment for a serious film photographer is a bulk container of orange indicating silica gel beads. These advanced beads start bright orange when they are dry and actively working. As they absorb water vapor, they slowly turn dark green. When they are completely green, they are 100% saturated and can no longer protect your film.
How to Recharge Them: When they turn green, you do not throw them away! Simply pour the beads onto a metal baking sheet and bake them in your kitchen oven at 250°F (120°C) for 2 to 3 hours. The heat evaporates the trapped water, turning the beads bright orange again. You can reuse them endlessly for decades.
IV. Fridge Maintenance and Proper Organization
How you maintain the physical hardware of the mini fridge plays a massive role in combating daily condensation buildup. You cannot ignore appliance health.
1. Avoid Thermoelectric Coolers (The Cardinal Rule)
Cheap, solid-state “beauty fridges” or 12V desk coolers are a disaster for analog film. As we explained deeply in our technical Thermoelectric vs Compressor Mini Fridge breakdown, these units rely entirely on ambient room temperature, struggle to maintain a stable, freezing climate, and crucially, they lack a dedicated mechanical dehumidification and drainage cycle.
They are notorious for constantly sweating and pooling stagnant water on their floors. You absolutely must store your film archive in a traditional, heavy-duty compressor-driven fridge. If you need a reliable model that won’t keep you awake in a studio or bedroom, browse our picks for the Best Quiet Mini Fridge for Office or Work.
2. Check the Rubber Door Seal
The number one mechanical cause of extreme condensation in a mini fridge is a failing, cracked, or dirty magnetic door gasket. If the rubber seal is loose, warm, wet air will constantly leak into the fridge 24 hours a day.
This forces the fridge compressor to run continuously to fight the heat, which rapidly freezes the incoming moisture into thick ice blocks on the back wall. When the compressor eventually cycles off, that ice melts, creating a literal waterfall of condensation. If you are experiencing this, follow our appliance repair guide on How to Fix a Refrigerator That Is Leaking Water Inside to resolve the gasket leak.
3. Keep the Fridge Completely Full
Empty space is the enemy of efficiency. A fridge full of cold thermal mass (like hundreds of rolls of film, or even just extra plastic water bottles placed on the bottom shelf) leaves significantly less physical room for warm, humid air to enter when you open the door.
Because the dense water bottles hold their freezing temperature so well, they act as a thermal battery. The fridge will recover its target temperature much faster, the compressor won’t have to work as hard, and you will generate drastically less condensation overall.
V. The Thawing Process: Preventing “Shock” Condensation
This is the critical final step where 90% of amateur photographers accidentally ruin their expensive film stocks. All your careful sealing and silica gel work will be completely undone in seconds if you skip this procedure.
If you take a freezing cold roll of 35mm film out of the fridge, immediately pop the plastic canister open, and expose the cold metal cartridge to a warm, humid room, condensation will instantly form directly on the raw film emulsion. It is the exact same, inescapable physical effect as a cold glass of ice water sweating heavily on a hot summer day.
If you load that sweating, damp film into your camera, the sticky emulsion will jam your advance gears, cause severe static discharge sparks across the negative, and ruin the shoot.
The Golden Rule of Thawing:
When you need a roll of film, take the entire sealed Tupperware container or freezer bag out of the fridge. Do not open it.
- Let the sealed container sit untouched on your desk at room temperature for at least 2 to 3 hours (or a full 12 hours overnight if you are pulling it from a deep freezer).
- As the film slowly warms up inside the sealed box, it remains completely protected by the dry micro-climate and the silica gel.
- Only once the film has slowly, safely reached ambient room temperature can you pop open the container, open the plastic canister, and load your camera.
Explore the Refrigerator Hub
Don’t stop here! Dive deeper into appliance mechanics and discover the best setups tailored specifically for specialty storage, off-grid cooling, and custom organization.
FAQ: Film Storage & Refrigeration
2026 Guide: Preserving Analogue Stock & Avoiding Condensation
Darkroom Tip: Always let your refrigerated film sit at room temperature for at least 2 hours before opening the canister to prevent instant condensation on the emulsion!
