
Inkbird ITC-308 Mini Fridge Setup for Perfect Fermentation (2026 Guide)
Ask any master brewer the absolute secret to award-winning beer, and they will all inevitably give you the exact same answer: strict temperature control during fermentation. You can buy the most expensive imported German hops and the finest English malts, but if your yeast gets too hot, it becomes stressed. Stressed yeast produces harsh, fruity off-flavors (esters) and harsh, solvent-like fusel alcohols that cause brutal hangovers. If it gets too cold, the yeast simply falls asleep, stalling your fermentation entirely and leaving you with flat, sweet, unfermented wort.
You cannot rely on a dark bedroom closet or a damp basement corner to maintain the strict, unwavering 68°F (20°C) environment that a classic American pale ale demands. Ambient room temperatures fluctuate wildly between day and night.
To brew professional-quality beer at home, you need a dedicated fermentation chamber. Fortunately, you don’t need to spend thousands of dollars on commercial stainless steel dairy equipment. By pairing a cheap, standard mini fridge with an Inkbird ITC-308 Temperature Controller, you can build a highly precise, automated curing environment in a single afternoon. In this comprehensive guide, we break down exactly how to execute an Inkbird ITC-308 mini fridge setup, route your thermal probe safely, and program the controller to protect your appliance’s fragile compressor.
The Quick Answer
To set up a fermentation chamber, you must use a compressor-driven mini fridge without a top freezer compartment. Turn the fridge’s internal thermostat dial to its maximum (coldest) setting, then plug the fridge’s power cord directly into the “COOLING” outlet of the Inkbird ITC-308. Tape the Inkbird’s temperature probe directly to the side of your fermentation vessel and cover it with foam insulation so it measures the liquid, not the air. Finally, program the Inkbird to your yeast’s ideal temperature (e.g., 68°F) and set a mandatory 3-to-5 minute Compressor Delay (PT) to prevent the fridge motor from burning out.
1. Choosing the Right Mini Fridge
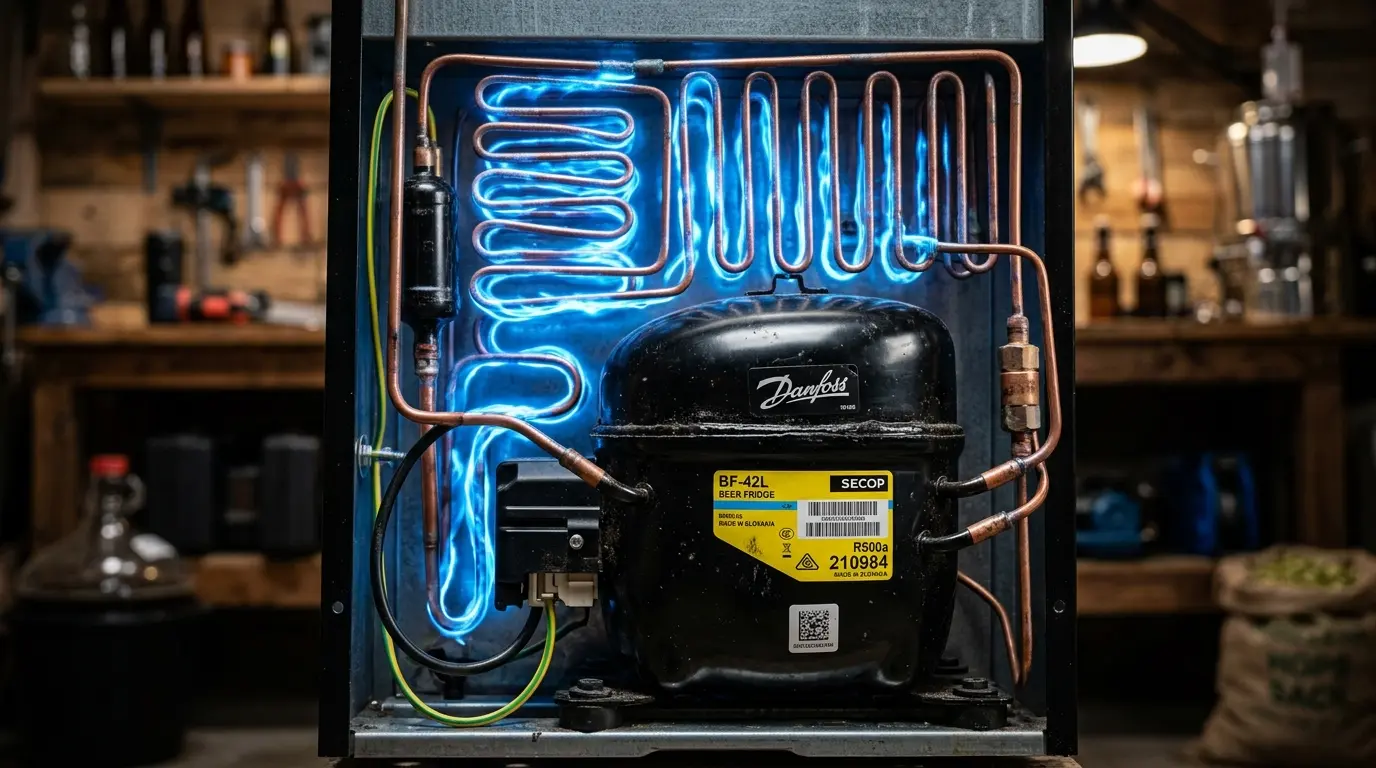
Before you plug anything in or start buying hardware, you must ensure your base appliance is actually capable of the job. A 5-gallon carboy of actively fermenting beer generates its own internal exothermic heat. You must use a powerful, heavy-duty compressor-driven mini fridge to battle this thermal mass.
The Thermoelectric Warning
As we detailed extensively in our Thermoelectric vs Compressor Mini Fridge for Skincare technical breakdown, solid-state thermoelectric (Peltier) coolers are incredibly weak and rely entirely on the ambient room temperature to function.
They simply do not have the raw cooling power (BTUs) to maintain 65°F in a hot garage, and they certainly cannot “cold crash” a massive 5-gallon carboy of beer down to near-freezing temperatures (34°F) to clear the yeast before kegging. Do not waste your money trying to brew in a beauty fridge or a cheap wine cooler.
The Ideal Fridge Geometry
Look for a standard, compressor-driven “cube” fridge (usually around 3.2 to 4.4 cubic feet). The most critical factor is the interior layout: avoid fridges with a bulky plastic freezer compartment taking up the top half.
A standard 5-gallon carboy or fermentation bucket is very tall. Once you add the rubber bung and the plastic airlock to the top, it requires immense vertical clearance. If your fridge has a freezer plate, you will not be able to shut the door. (Note: If you prefer a full-sized setup to brew multiple carboys simultaneously or to hold full-sized kegs, bypass the mini fridge entirely and check our expert guide on the Most Reliable Refrigerator Without Ice Maker for affordable, massive cooling volume).
2. The Hardware Setup: Bypassing the Internal Thermostat
Decades ago, building a fermentation chamber required dangerously splicing 110V electrical wires, soldering circuit boards, and risking electrocution to bypass a fridge’s internal thermostat.
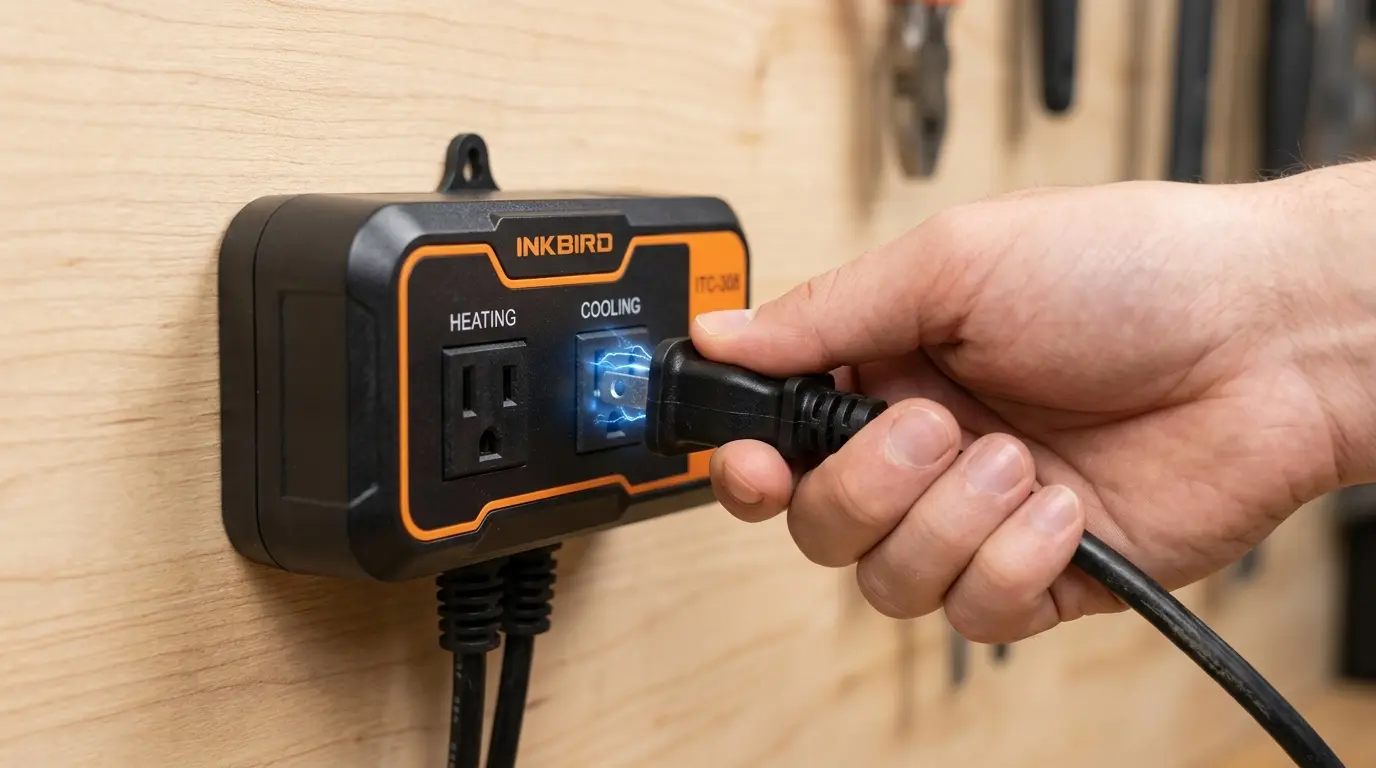
The absolute brilliance of the Inkbird ITC-308 is that it requires absolutely zero electrical wiring, stripping, or splicing. It is a brilliant, dual-relay plug-and-play system that physically cuts the power from the wall outlet to override your fridge’s built-in, wildly inaccurate mechanical dial.
Step-by-Step Connection Guide:
- Max Out the Fridge: First, plug your mini fridge directly into a standard wall outlet. Turn its internal temperature dial to the absolute coldest possible setting (usually labeled “7” or “Max”). We want the fridge to think it should be running 100% of the time whenever it receives electricity.
- Transfer the Power: Unplug the fridge from the wall outlet. Now, plug the fridge’s power cord directly into the receptacle labeled “COOLING” on the dangling power strip of the Inkbird ITC-308.
- Add a Heater (Optional but Highly Recommended): If you brew in a cold garage or an uninsulated basement during the winter, the ambient air might drop below your yeast’s 68°F requirement. You will need a heat source. Plug a small ceramic space heater, a reptile heat lamp, or a specialized flexible fermentation heat wrap into the “HEATING” receptacle on the Inkbird. (Safety Warning: Never point a high-wattage space heater directly at the plastic walls of the fridge, or you will melt the interior and start a fire).
- Power the Brain: Finally, plug the main, heavy-duty power cord of the Inkbird ITC-308 directly into your wall outlet.
The Inkbird is now the master brain of your operation. It will completely cut the electrical power to your fridge when the beer is too cold, and cut power to the heater when the beer is too hot, creating a perfectly balanced micro-climate.
3. Probe Placement and Routing (The Danger Zone)
The Inkbird relies entirely on a stainless steel temperature probe to read the climate. Where you place this tiny metal probe dictates the ultimate success or catastrophic failure of your brew.
Where to Place the Probe: Thermal Mass
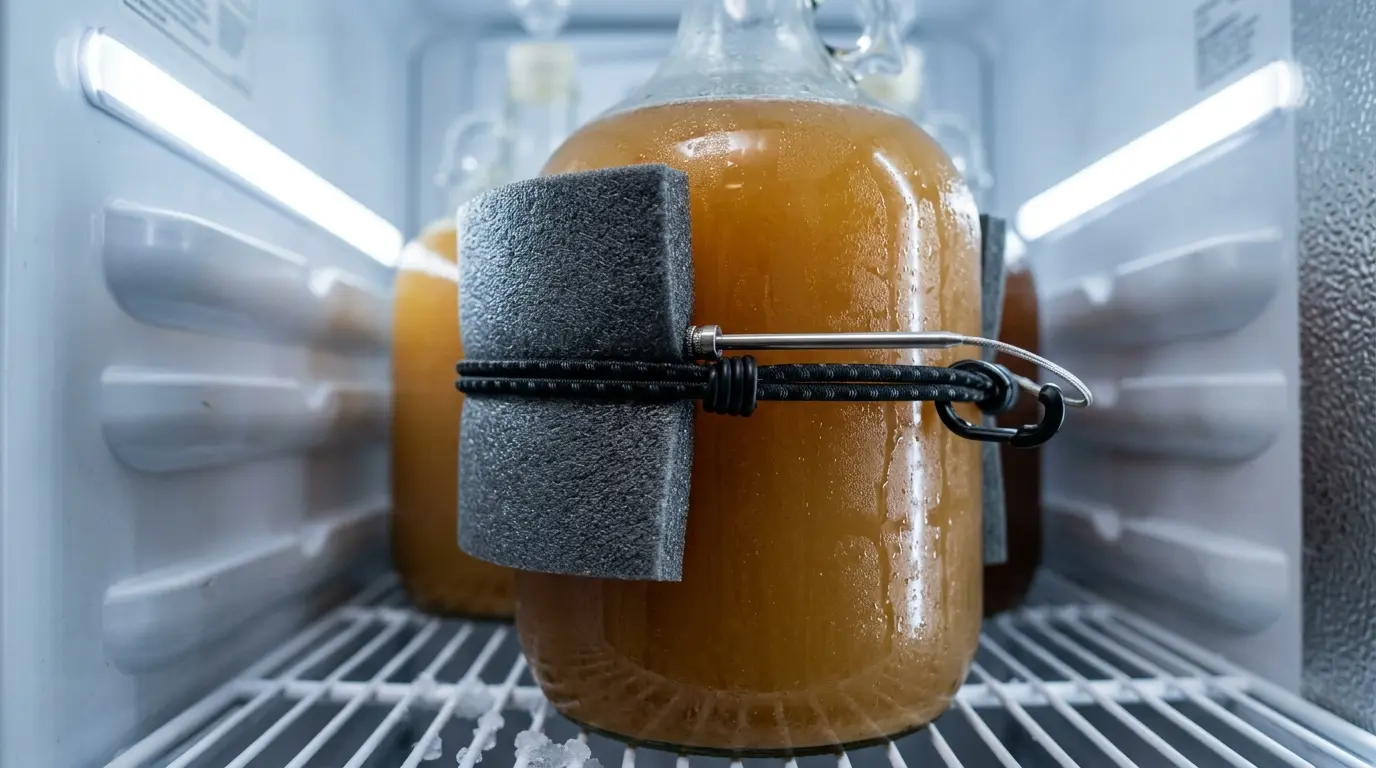
Do not simply let the probe dangle in the air inside the empty space of the fridge.
Air has very little thermal mass. The air temperature inside a fridge fluctuates wildly every single time the compressor kicks on or off. However, 5 gallons of dense liquid takes many hours to change temperature. You want to measure the temperature of the beer, not the air.
The Solution: Use a piece of thick foam insulation, neoprene, or even folded bubble wrap, and use a bungee cord or heavy-duty tape to strap the metal probe directly against the side of your glass carboy or plastic fermenter. The foam completely insulates the probe from the surrounding cold fridge air, forcing the metal sensor to read the liquid’s temperature straight through the vessel wall.
How to Route the Cable (And What Not To Do)
You have to get the probe cable from the Inkbird (outside the fridge) to the carboy (inside the fridge).
- The Safe Method: Simply run the thin black wire through the front door hinge side and close the door. The magnetic rubber gasket will easily compress and seal around the thin wire. It will cause a very minor air leak, but it is generally harmless and will not overwork your compressor.
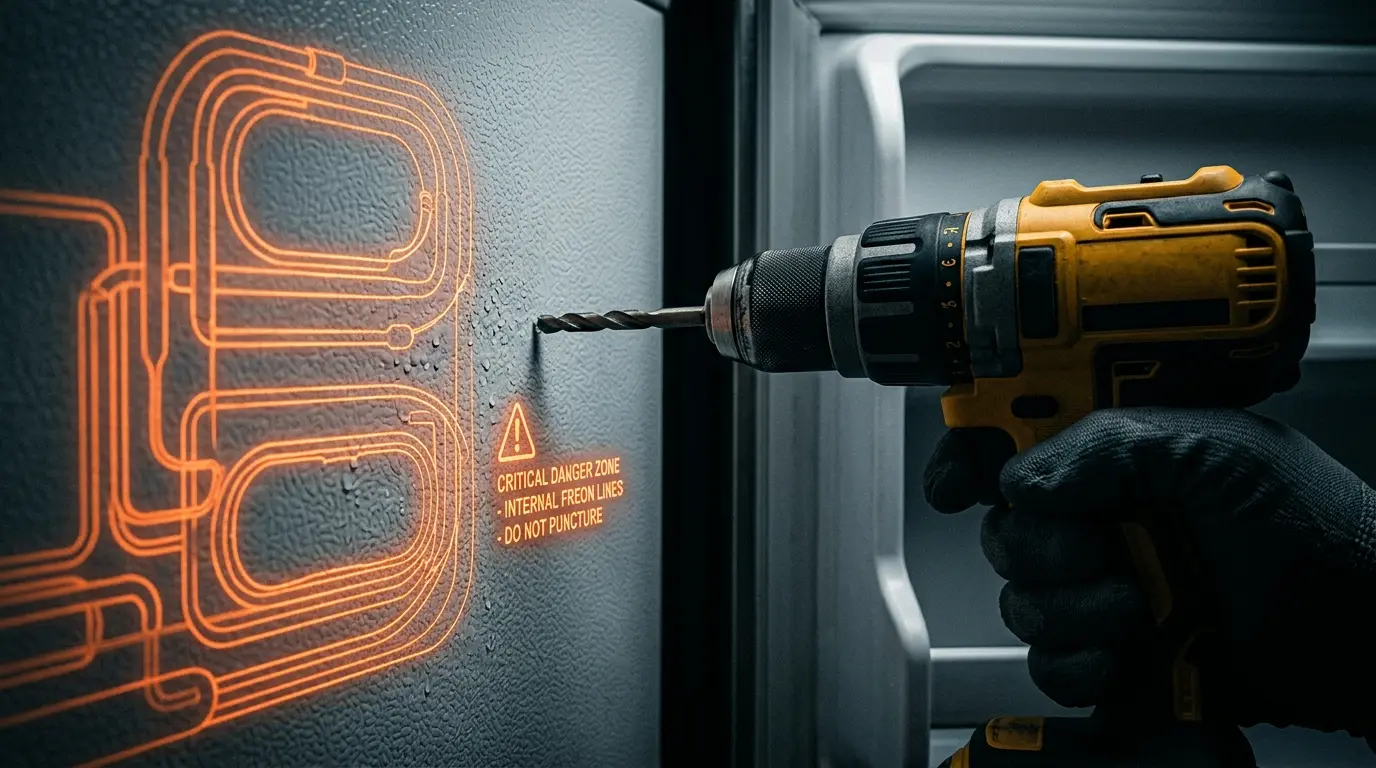
- The Advanced (Dangerous) Method: Many brewers prefer a seamless look and decide to drill a clean hole straight through the side or top of the fridge to route the wires. Do not do this blindly. Modern mini fridges use “skin condensers,” meaning the side walls and ceiling are packed tightly with invisible, high-pressure Freon lines. If your drill bit hits one, the fridge will hiss, expel toxic gas, and be permanently ruined. You must read our mandatory safety manual on How to Find Coolant Lines in a Mini Fridge Before Drilling before you even think about picking up a power tool.
4. Programming the Inkbird ITC-308
Now that the hardware is safely installed and the probe is insulated against the carboy, you need to program the parameters. Hold down the “SET” button on the controller for three seconds to enter the digital menu.
Here are the optimal, universally accepted settings for a standard Ale fermentation (which prefers a stable ~68°F environment):
| Setting Code | Meaning | Recommended Value | Explanation |
|---|---|---|---|
| TS | Temperature Set Value | 68°F (20°C) | This is your absolute target temperature. Set this to your specific yeast strain’s ideal middle range. |
| HD | Heating Differential | 1°F | How far the temp can drop before the heater kicks on. (If the beer drops to 67°F, the heater activates). |
| CD | Cooling Differential | 1°F | How high the temp can rise before the fridge kicks on. (If the beer rises to 69°F, the fridge activates). |
| PT | Compressor Delay | 3 to 5 Minutes | CRITICAL: Prevents short-cycling. See the detailed breakdown below. |
| CA | Temperature Calibration | 0 (Default) | If you test your probe in a glass of ice water and it reads 34°F instead of 32°F, you can offset the error here (-2°F). |
Why the PT (Compressor Delay) is Mandatory
This is the most important setting on the device. When a refrigerator turns off, the pressurized refrigerant gases inside the copper lines need time to equalize and settle. If the Inkbird senses a temperature spike and tries to turn the compressor back on immediately after it just turned off, the motor will have to fight against immense head pressure.
This is called “short cycling.” It causes a massive electrical surge and will burn out the fridge’s motor in a matter of weeks. Setting the PT to 3 or 5 minutes forces the Inkbird to wait, ensuring the internal fridge pressures are safe before it sends power back to the compressor.
Because the Inkbird cuts power abruptly, it acts like a hard reset for the appliance. If your fridge starts vibrating aggressively or clicking loudly every time the Inkbird cycles the power back on, the sudden torque might be rattling loose metal components near the compressor base. Do not ignore this. Follow our quick mechanical fix guide on How to Fix a Mini Fridge Rattling Noise to secure the lines.
Explore the Refrigerator Hub
Don’t stop here! Dive deeper into appliance mechanics and discover the best DIY setups tailored specifically for home brewing, dry aging, and custom kitchen upgrades.
FAQ: Inkbird ITC-308 & DIY Fermentation Chambers
2026 Guide: Temperature Control, Probes & Safe Drilling
Brewing Tip: Tape a piece of bubble wrap or packing foam over your temperature probe to insulate it from the ambient fridge air. It guarantees a perfect liquid temperature reading!
