
Vacuum Sealing Salad in a Mason Jar: The Ultimate Crispness Guide (2026)
Sunday meal prep is a fantastic, highly productive habit—right up until Thursday rolls around, you sit down at your desk for lunch, and you open your plastic Tupperware only to find a sad, wilted, slimy pile of brown lettuce. Fresh greens are notoriously difficult to keep crisp once they have been chopped and prepared.
The moment a kitchen knife slices through a lettuce leaf, the microscopic cell walls break, immediately releasing sensitive enzymes that react violently with ambient oxygen. This causes rapid oxidation (browning) and catastrophic moisture loss. For years, the “Mason Jar Salad” has been a massively popular Pinterest and Instagram trend, relying purely on gravity and strategic ingredient layering to keep the acidic dressing away from the delicate greens. However, layering alone cannot stop oxidation.
To truly beat the clock and keep your Friday afternoon salad tasting exactly as vibrant and crunchy as Monday’s fresh harvest, you must combine strategic architectural layering with the raw power of a vacuum seal. In this comprehensive guide, we break down the exact biological science of vacuum sealing salad in a Mason jar, the non-negotiable layering hierarchy, and the specialized tools you need to pull it off. For a complete overview of all our preservation equipment reviews, explore our master directory: The Ultimate Vacuum Sealing Hub: Food Storage, Sous Vide, Mason Jars & Buying Guides (2026).
The Quick Answer
Vacuum sealing a Mason jar removes the oxygen required for enzymatic browning, extending the crisp lifespan of a prepared salad from a maximum of 3 days to an incredible 7 to 10 days. To succeed, you must build the salad defensively to prevent osmotic wilt: layer dressing at the absolute bottom, dense vegetables next, cold proteins in the middle, and bone-dry greens at the very top. Use a cordless electric jar sealer to extract the air, and never seal warm ingredients.
I. The Shelf Life (Why the Vacuum Matters)
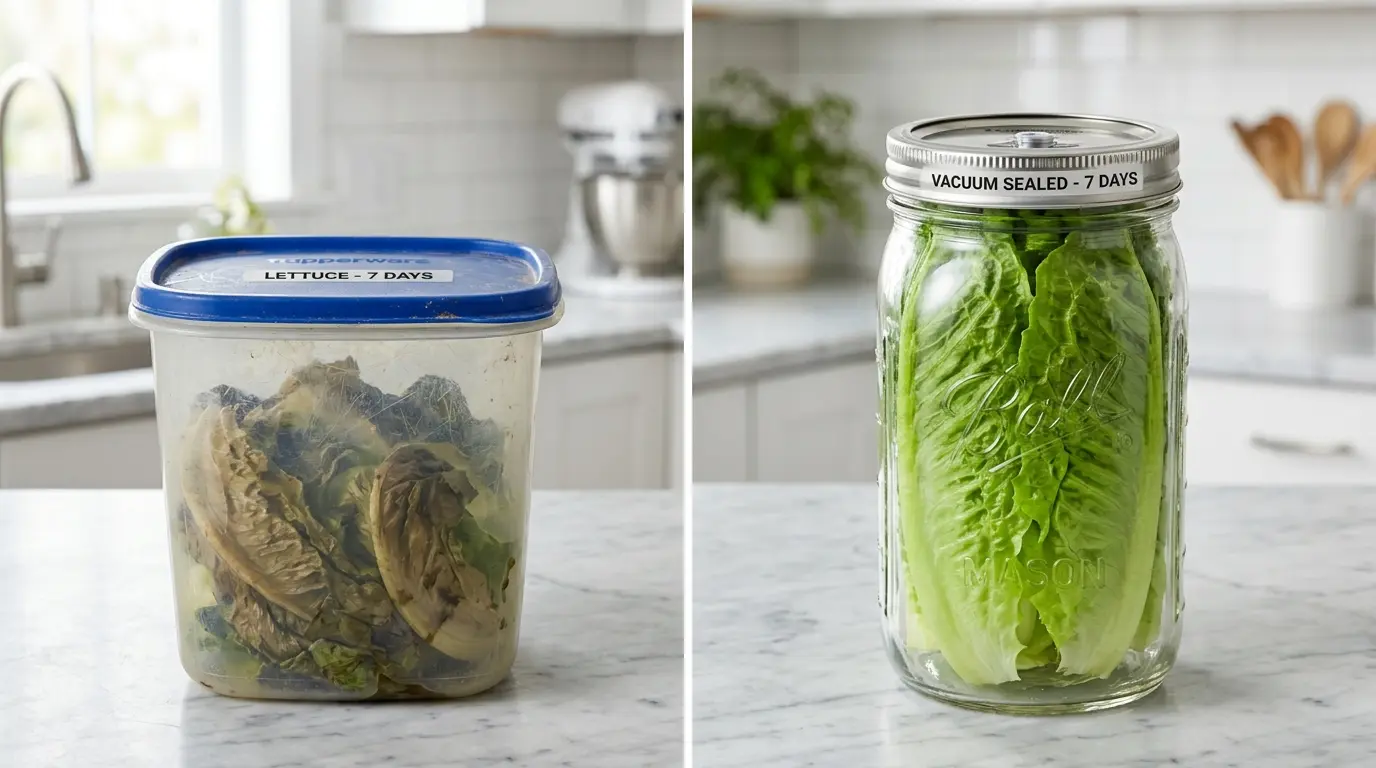
If you simply pack a heavy glass Mason jar with a beautiful, colorful salad and tightly screw the metal lid on by hand, the trapped ambient air inside the glass will inevitably cause the delicate lettuce to begin wilting and browning within 48 to 72 hours.
The Biology of Wilting (PPO)
When you chop vegetables, you expose an enzyme called Polyphenol Oxidase (PPO). When PPO comes into contact with oxygen, it produces melanin, which is the exact same pigment that causes apples, avocados, and lettuce to turn unappetizingly brown. Furthermore, as the plant cells are exposed to air, they respire and lose moisture, physically causing the crunch to vanish.
By using a dedicated jar sealer to forcefully physically remove that trapped oxygen, you instantly halt the enzymatic browning process and prevent internal moisture from evaporating from the leaves into the empty space of the jar.
- Standard Mason Jar Salad Shelf Life: 3 Days (max) before severe wilting and texture loss.
- Vacuum Sealed Mason Jar Salad Shelf Life: 7 to 10 Days (staying perfectly crisp, vibrant, and crunchy).
This extended 10-day timeline completely revolutionizes household meal prep. It means you only have to systematically chop vegetables, rigorously wash greens, and dirty your cutting board exactly once a week.
II. The Golden Rule: The Layering Hierarchy

A vacuum seal will flawlessly preserve the biological integrity of the lettuce, but if you architecturally pack the jar incorrectly, the laws of physics will ruin your lunch. If acidic dressing touches delicate greens, it causes osmosis—the acid violently draws the water out of the cell walls, instantly turning the greens to a mushy, soggy paste. You must build the salad defensively from the bottom up.
Layer 1 (The Bottom): The Dressing
Always pour your vinaigrette, olive oil, or heavy creamy dressing in first. Depending on the size of your jar, 2 to 4 tablespoons is standard. Keeping the heavy liquid trapped at the absolute bottom of the glass is the foundation of the entire system.
Layer 2 (The Shield): Hard Vegetables
Next, add dense, highly non-absorbent ingredients that can actually benefit from marinating safely in the acidic dressing for days without breaking down. Think whole cherry tomatoes, thickly chopped carrots, radishes, robust cucumbers, whole chickpeas, or hearty bell peppers.
Layer 3 (The Proteins & Carbs)
Now that you have built a dry buffer above the dressing, add your cooked, diced chicken breast, hard-boiled eggs, tofu, quinoa, or cold pasta.
Crucial Safety Note: Ensure all cooked proteins and grains are completely cold (refrigerator temperature) before adding them to the jar. Vacuum sealing warm food generates steam that ruins the seal and traps the food in the bacterial “Danger Zone,” an extreme hazard we explore deeply in our Foods You Should Never Vacuum Seal guide.
Layer 4 (The Delicate Toppings)
Add your fragile ingredients that require a completely dry environment to maintain their texture. This is where you place your crumbled feta or blue cheese, dried cranberries, slivered almonds, walnuts, or pumpkin seeds.
Layer 5 (The Top): The Greens
Finally, gently stuff your chopped romaine, spinach, arugula, or kale into the very top of the jar. Because the lettuce is packed as far away from the dressing as physically possible, and will be sitting in a dark, oxygen-free vacuum environment, it will remain bone-dry, vibrant green, and intensely crisp all week.
III. The Tools: How to Pull the Vacuum
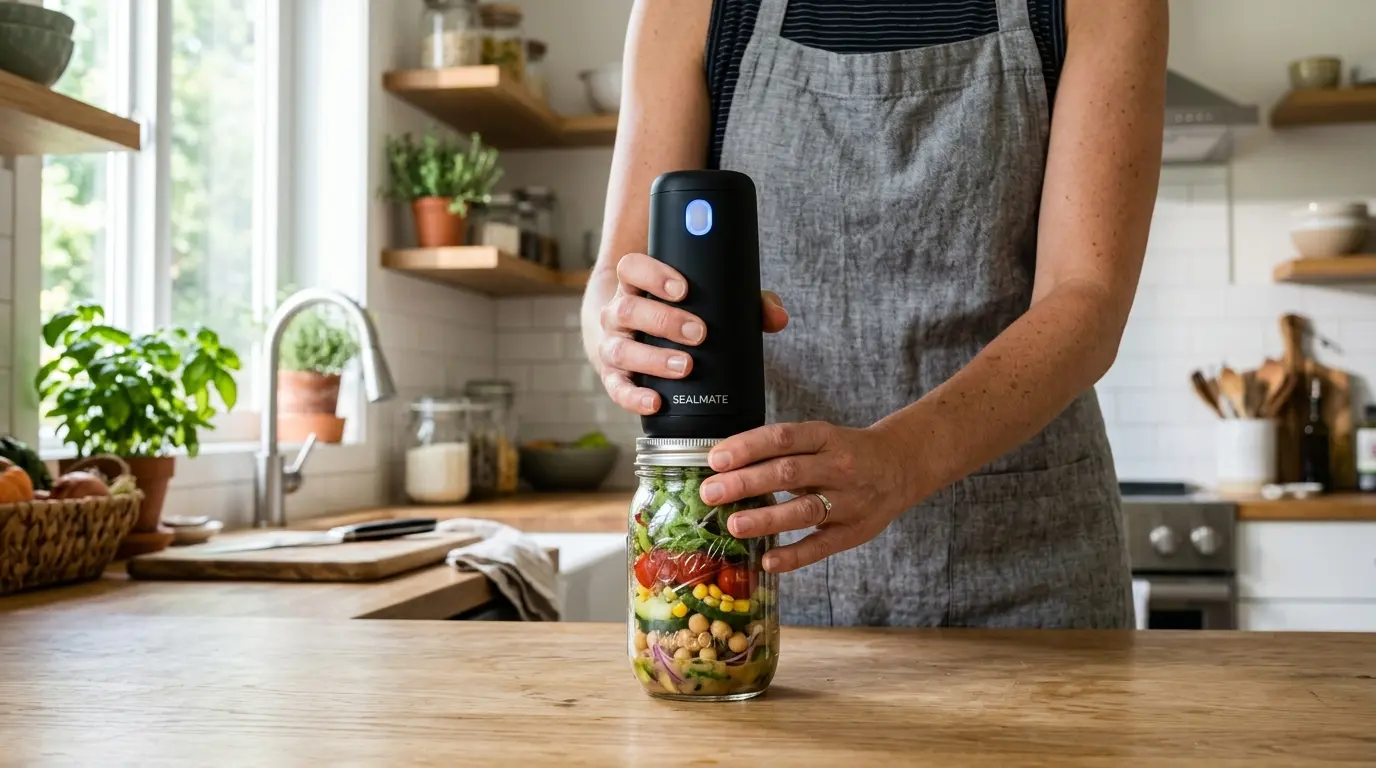
You cannot seal a rigid glass jar using standard plastic vacuum bags. You need specialized, highly engineered equipment designed specifically to compress the “Plastisol” rubber ring on the underside of a standard Mason jar lid.
1. The Electric Jar Sealer
This is the absolute most popular, modern, aesthetic method. It is a small, cordless, USB-rechargeable puck that sits directly over the flat metal lid. You press one button, and a miniaturized motor sucks the air out in precisely 30 seconds.
To ensure you do not buy a cheap knockoff with a weak motor, read our rigorous testing guide: 7 Best Electric Mason Jar Vacuum Sealers in 2026: Tested & Reviewed.
2. The Manual Hand Pump
If you prefer off-grid reliability and hate charging cables, heavy-duty mechanical tools (like the Pure MVP) allow you to manually pump the air out of the jar using a T-handle piston, guaranteeing a seal even during a power outage.
We rigorously compare the physical effort versus the mechanical reward in our Pure MVP Vacuum Pump vs. Electric Jar Sealers showdown.
3. The FoodSaver Hose Attachment
If you already own a massive, full-sized external suction machine (like the V4840), you do not need to buy a new standalone motor. You can buy a cheap, $15 plastic accessory hood and a thin rubber hose attachment that connects your massive countertop machine directly to the top of the glass jar. To learn how to execute this, see How to Vacuum Seal Mason Jars Without a Bulky FoodSaver Machine.
IV. The Moisture Threat: Drying Your Greens
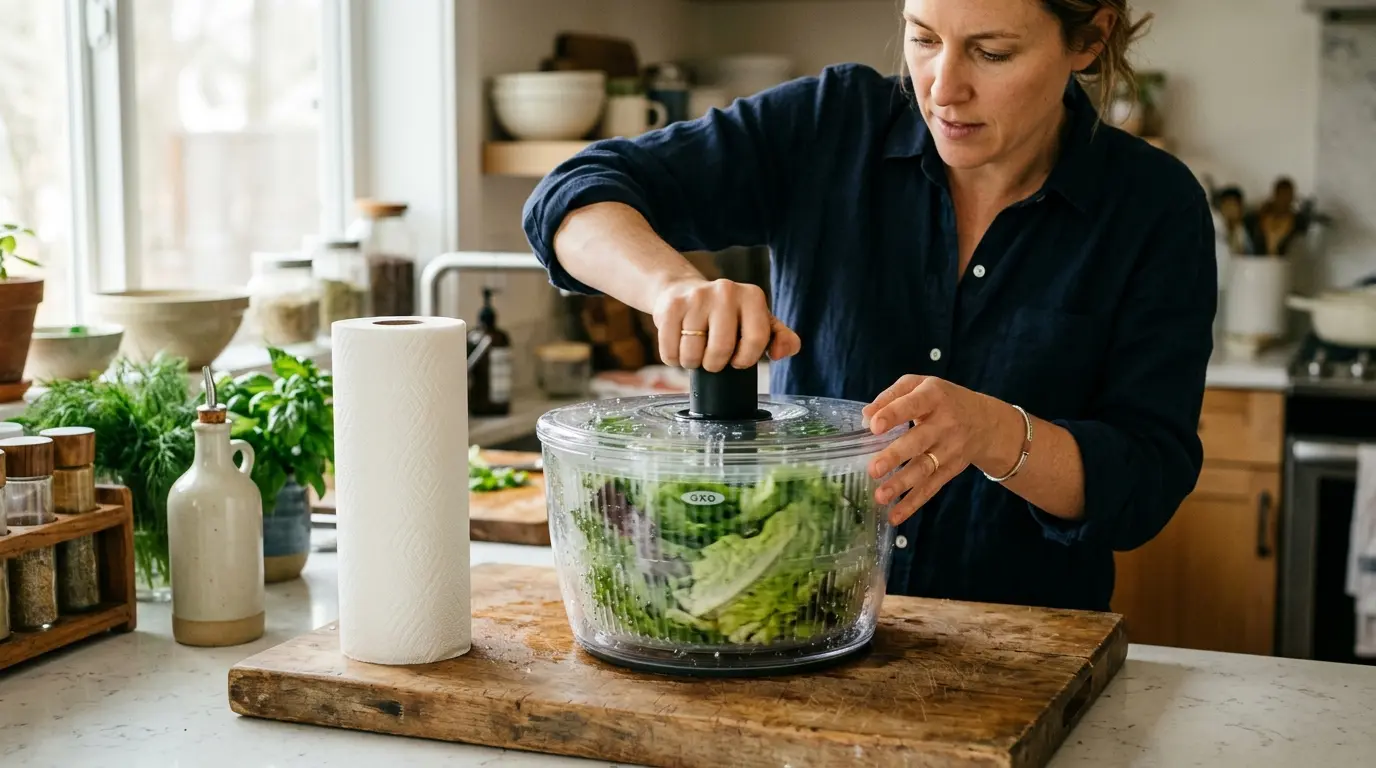
Even if your layering architecture is absolutely flawless, there is a silent killer that will ruin your entire week of meal prep: Water. The single biggest, most devastating mistake people make when vacuum sealing salads is failing to dry the lettuce properly after washing it in the sink.
If you roughly wash your lettuce and shove it into the jar while it is still noticeably damp, the vacuum sealer will aggressively trap that excess surface water against the fragile leaves. In a dark, zero-oxygen environment, trapped water acts as a magnifying glass for bacterial decay and rot, causing the delicate leaves to turn translucent, dark green, and slimy almost instantly.
The Mandatory Fix:
You absolutely must use a high-quality, centrifugal salad spinner. Spin the freshly washed greens aggressively to remove the bulk of the water, and then lay them out flat and pat them completely, totally dry with a clean paper towel before packing them into the top of your Mason jar. Bone-dry lettuce is the absolute secret to 10-day crispness.
V. Serving Your Culinary Masterpiece
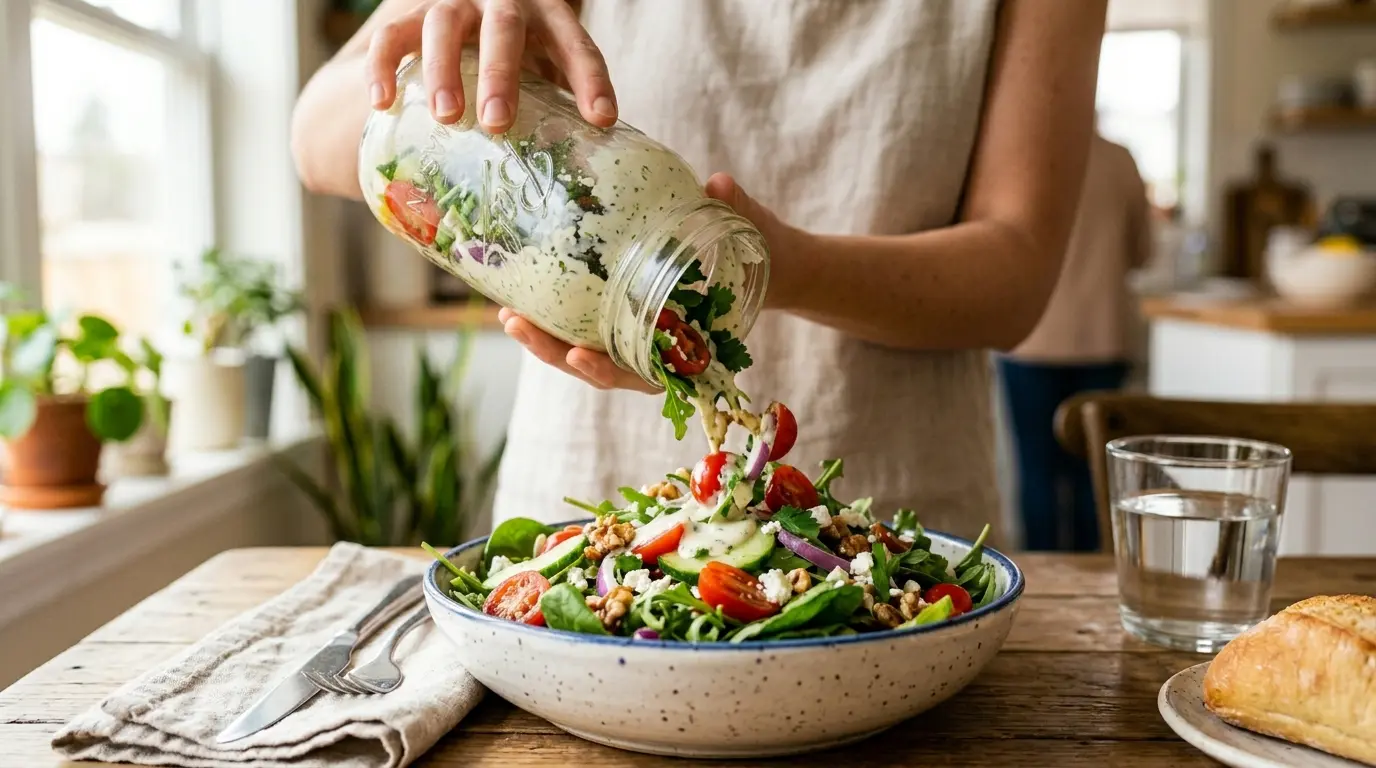
When Friday afternoon finally arrives, serving the salad is an incredibly satisfying event. However, you cannot simply unscrew the metal band and pull the lid off. The atmospheric pressure of the room is holding the flat metal lid crushed against the glass jar with over 10 pounds of invisible force.
How to Release the Vacuum Safely
Do not use a sharp steak knife to pry the lid, as you will permanently dent the metal rim, meaning the lid can never hold a vacuum seal again.
Instead, use the dull, flat edge of a butter knife, the back of a spoon, or a specialized plastic opening tool (which is often included with electric jar sealers). Gently pry the very edge of the flat metal lid upward until you hear the incredibly loud, satisfying HISS of ambient air rushing rapidly back into the jar to equalize the pressure.
The Perfect Pour
Because you meticulously layered the dressing at the absolute bottom of the jar, plating the meal is effortless. All you have to do is turn the glass jar completely upside down over a large, wide bowl.
The crisp, bone-dry greens will fall out first to form a perfect bed, followed instantly by the proteins and vegetables, with the rich, marinated dressing cascading perfectly over the top of the entire mountain. Toss lightly with a fork, and enjoy a vibrant, crunchy salad that tastes like it was chopped just five minutes ago.
Explore the Vacuum Sealing Hub
Don’t stop here! Dive deeper into the science of glass preservation, explore handheld machine comparisons, and read our latest hardware reviews for 2026.
FAQ: Vacuum Sealing Salads
2026 Guide: Mason Jars, Crispness, and Preventing Spoilage
Meal Prep Tip: Always put your dressing at the very bottom, followed by hearty veggies (like carrots or cucumbers), and keep your delicate lettuce at the very top!
