
Liquid Block Bags vs Freezing Liquids Before Vacuum Sealing: Which is Better? (2026)
If you own a standard external suction vacuum sealer (like a FoodSaver or Nesco), you already know its absolute greatest, most frustrating weakness: moisture. The exact moment you try to seal a beautifully marinated flank steak, a batch of fresh salsa, or a rich winter stew, the machine’s powerful pump ruthlessly sucks the liquid straight up the bag.
This inevitably ruins the thermal seal by creating a steam barrier, creates a sticky, greasy mess all over your kitchen counter, and risks permanently destroying your expensive internal vacuum pump.
For years, dedicated home cooks and weekend meal preppers have relied on one classic, low-tech workaround to bypass this massive design flaw: Pre-freezing. But recently, packaging manufacturers introduced a high-tech, highly convenient alternative directly to the consumer market: Liquid Block Bags. If you are tired of cleaning raw meat juices out of your drip tray, you have to choose a side. In this comprehensive guide, we compare both methods to determine which offers the best workflow, the lowest cost, and the most reliable seal for your wet foods.
The Quick Answer
Liquid Block Bags are perfect for fast, instant sealing of raw meats, fish, and lightly marinated proteins; they feature an absorbent strip that stops juices from ruining the seal, but they are highly expensive. The Pre-Freeze Method is 100% free and is the absolute only way to seal heavy, pure liquids (like soups, broths, and massive batches of chili) using a standard machine. For the ultimate wet-food prep, using both methods interchangeably is required unless you upgrade entirely to a commercial Chamber Vacuum Sealer.
For a complete look at all our preservation techniques and machine reviews, explore our master directory: Vacuum Sealing Excellence: The Definitive Guide for 2026.
I. The Pre-Freeze Method: The Classic, Free Hack
Before specialized high-tech bags existed, the “Pre-Freeze” method was the undisputed, only reliable way to seal soups, stews, and heavily marinated meats without making a catastrophic mess on the kitchen counter. It relies on simply temporarily changing the physical state of the liquid to outsmart the appliance.
How It Works: The Thermodynamics
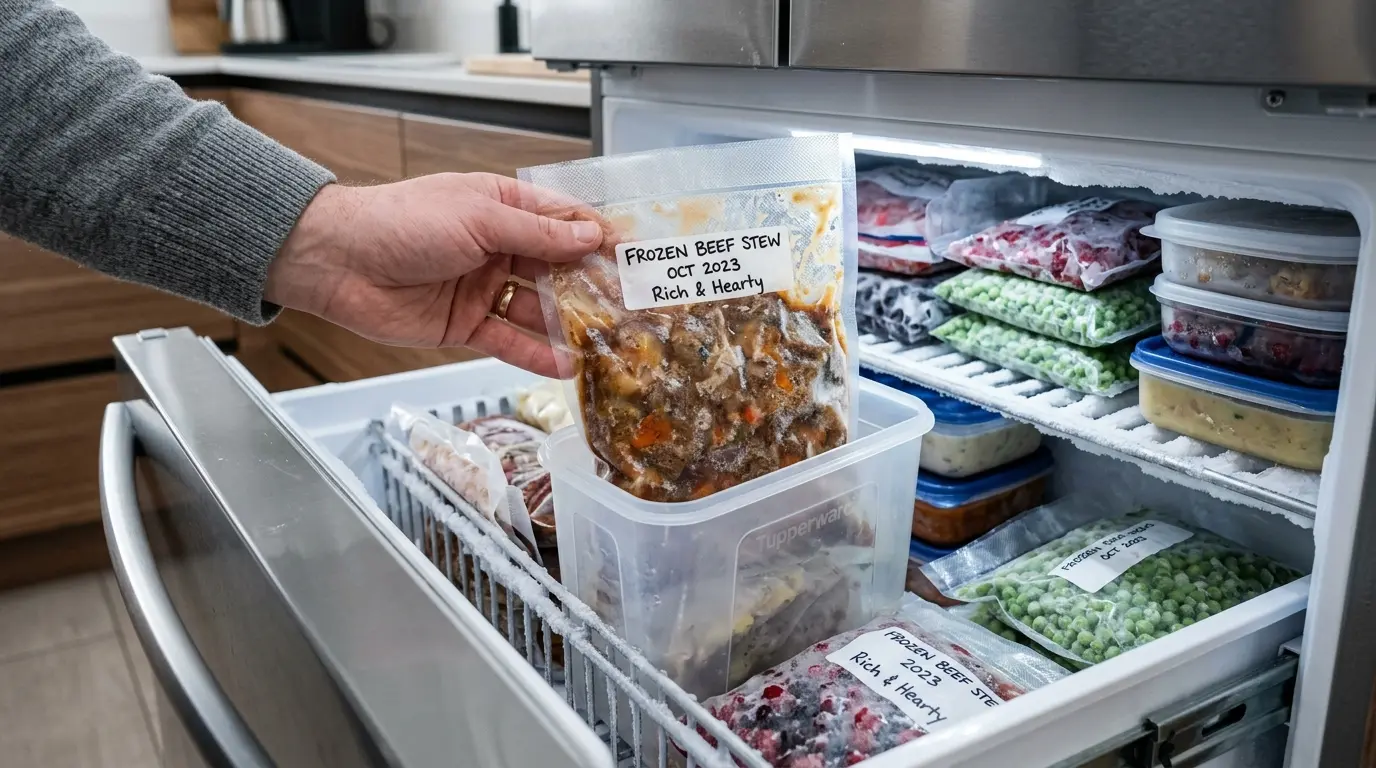
You pour your liquid soup or place your soaking wet meat directly into a standard, cheap vacuum bag. Instead of sealing it immediately, you prop the bag upright. (Pro tip: placing the unsealed bag into a tall Tupperware container or a large plastic pitcher prevents it from falling over and spilling).
You place the upright bag in the deep freezer for 1 to 2 hours. You do not need the liquid to become a rock-solid, impenetrable brick of ice; you just need the surface liquid to turn into a highly viscous, icy slush. Once the liquid has hardened, you take it out and vacuum seal it normally. Because the moisture is physically frozen in place, the machine’s pump cannot suck it out into the heating element.
The Pros
It is 100% free. You can use your standard, incredibly cheap bulk vacuum bag rolls. Most importantly, it works flawlessly and perfectly even for pure, unadulterated liquids like chicken stock, pasta sauce, and heavy stews.
We cover this exhaustive technique extensively in our tutorial on How to Vacuum Seal Liquids Without a Chamber Sealer.
The Cons
It completely ruins your workflow. If you are trying to meal-prep for the entire month on a busy Sunday afternoon, being forced to wait two hours for bags of chili to freeze creates a massive, frustrating bottleneck in your kitchen. You have to babysit the freezer instead of finishing your chores.
II. Liquid Block Bags: The Modern Convenience
Liquid Block bags (sometimes marketed as “Liquid Catch” or “Moisture Barrier” bags) are specifically engineered by packaging scientists to solve the moisture problem for consumer-grade external suction machines.
How It Works: Capillary Action
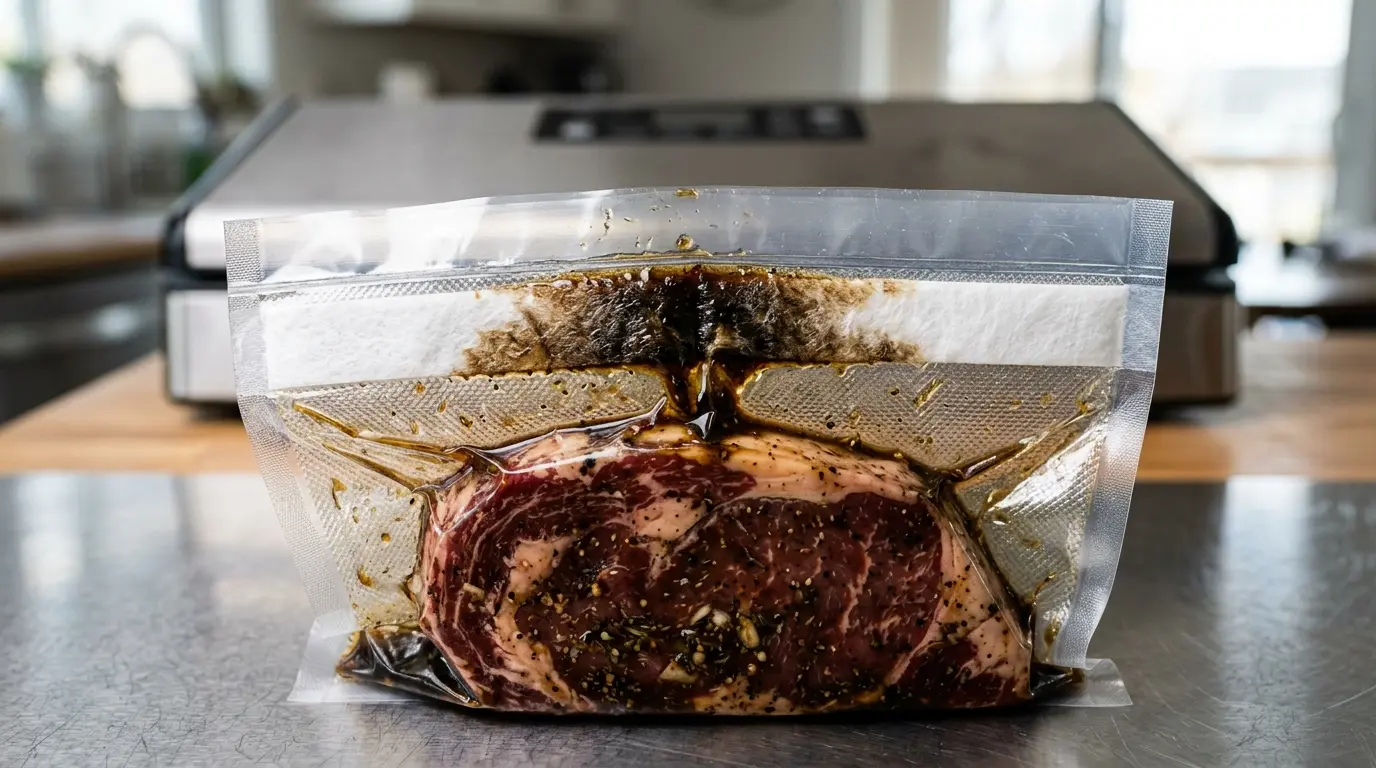
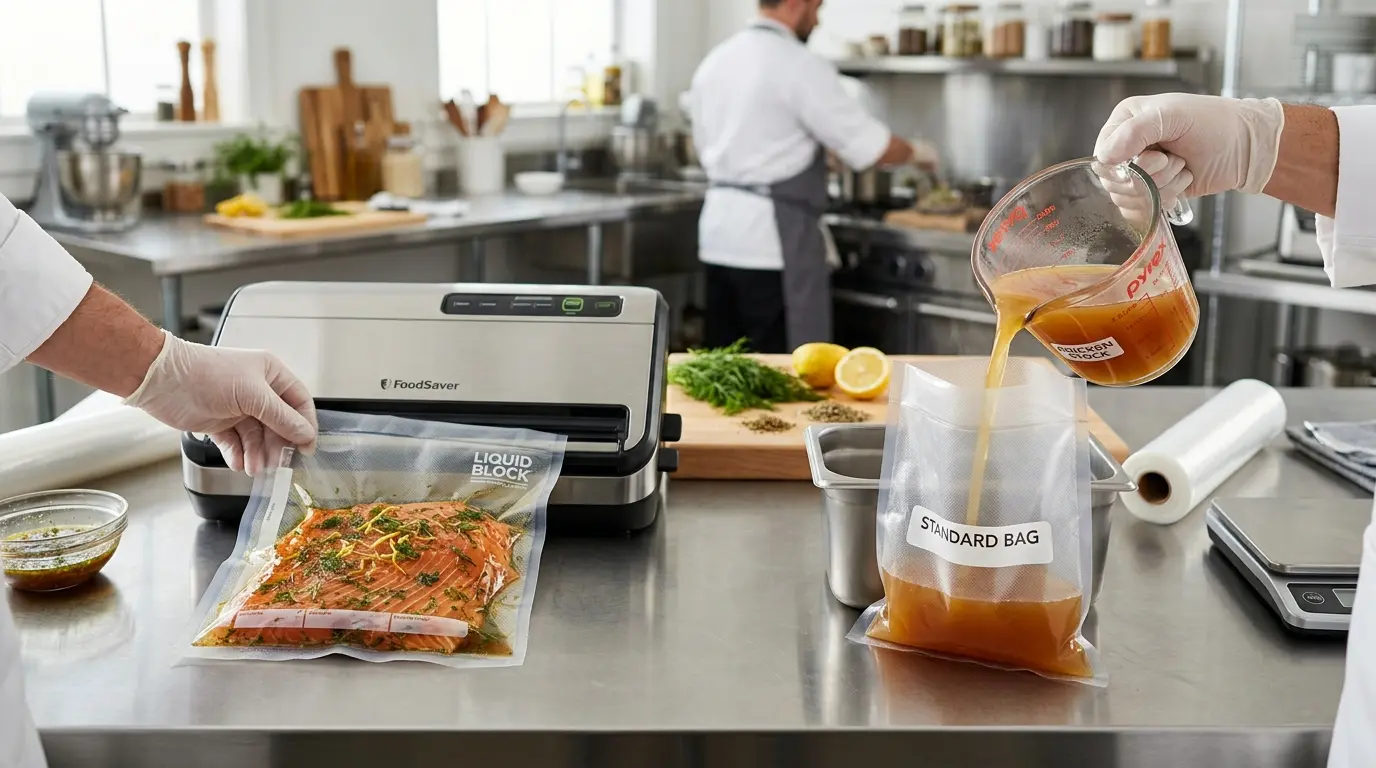
From the outside, these bags look exactly like standard embossed vacuum bags. But if you look near the top opening, they feature a thick, highly absorbent strip (often made of food-safe cotton, cellulose, or specialized hydro-polymers) physically fused into the inner plastic lining.
As the machine aggressively sucks the air out of the bag, the rogue liquid is forced to travel upward. When the liquid hits the strip, the material instantly absorbs the moisture like an industrial sponge. This utilizes capillary action to create a physical, dry dam that perfectly protects the critical Teflon heat-seal line at the very top of the bag.
The Pros
Instant gratification. There is zero prep time, zero extra dishes, and absolutely no waiting around. You can drop a dripping, juicy, soy-sauce marinated pork chop directly into the bag and seal it perfectly on the very first try.
To see which specific brands perform best under pressure, read our lab-tested review: The Best Vacuum Sealer Bags for Wet Food: Liquid Block Technology.
The Cons
The “Convenience Tax.” These bags are significantly more expensive than standard bulk plastic rolls (often costing 3 to 4 times as much per bag).
Furthermore, the absorbent strip has a strict physical volume limit. It works flawlessly for meat juices, but it cannot absorb an entire bowl of soup. If you try to seal a bag of pure chili, the strip will instantly overflow and flood your machine.
III. The Showdown: When to Use Which Method
You do not necessarily have to pick just one allegiance. A highly efficient, smart kitchen utilizes both methods interchangeably depending on exactly what is on the prep menu for the day.
Use Liquid Block Bags For:
- Raw Meats: Fresh steaks, chicken breasts, and pork chops naturally release massive amounts of myoglobin and water juices under intense vacuum pressure. Liquid block bags handle this moderate moisture perfectly.
- Light Marinades: If your meat is simply coated in a few tablespoons of olive oil, soy sauce, or thick BBQ sauce, the absorbent strip will trap it easily before it hits the weld.
- Delicate Fish: Seafood is notoriously wet. A liquid block bag ensures a pristine, airtight seal without forcing you to crush the delicate fillets by wiping them too aggressively with paper towels.
Use the Pre-Freeze Method For:
- Pure Liquids: Soups, bone broths, and massive batches of stew will completely and instantly overwhelm a liquid block bag, soaking the strip and ruining the seal. You absolutely must pre-freeze these items.
- Budget Bulk Prepping: If you are processing 50 pounds of cheap ground beef, using highly expensive $0.80 liquid block bags for every single package is a massive waste of money. Pre-freezing or simply patting the meat dry is far more economical.
- Excessive Oil: Thick, oily marinades can sometimes bypass cheap absorption strips. Freezing the oil into a solid fat ensures a perfect seal.
IV. The Ultimate Alternative: Upgrade Your Machine
If you find yourself constantly debating between waiting two hours for soup to freeze or spending premium retail prices on highly specialized liquid block bags, you have officially outgrown your appliance.
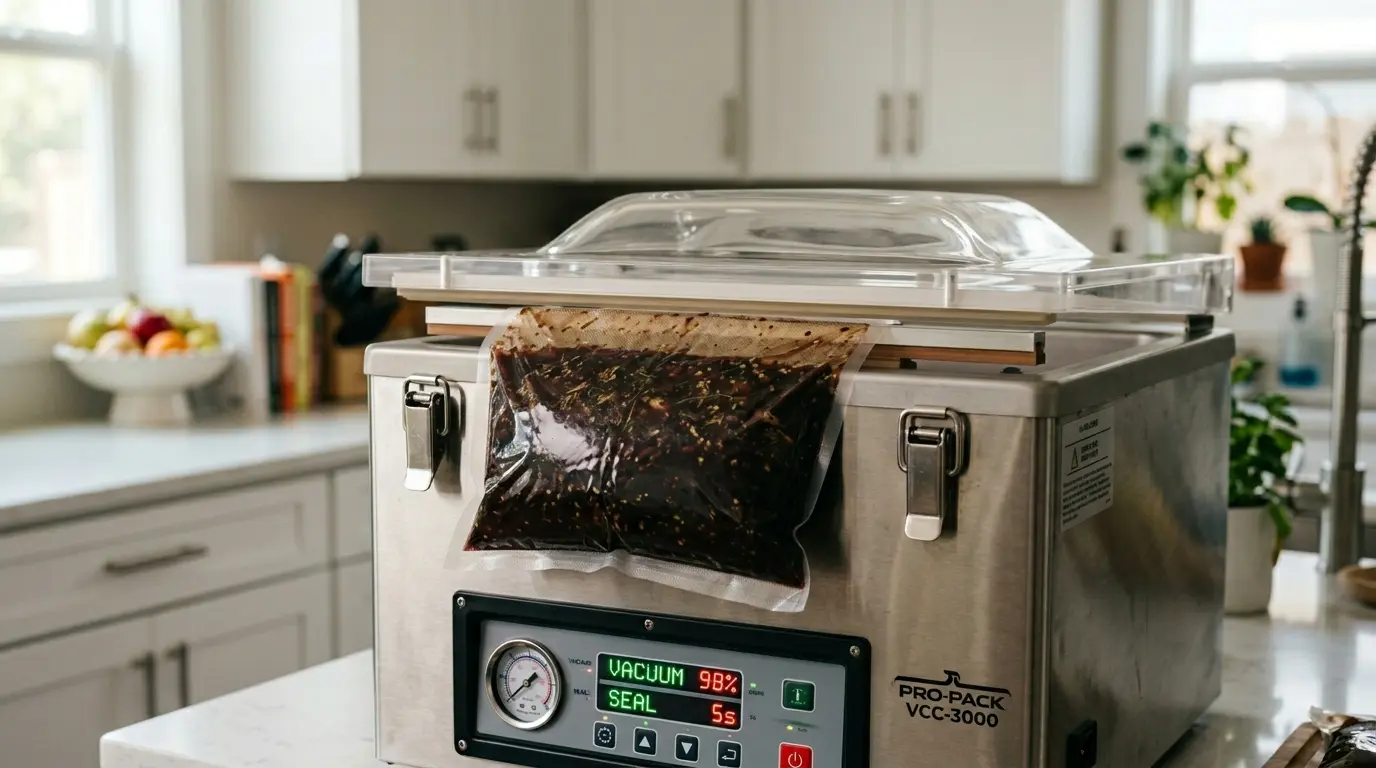
Neither of these frustrating culinary hacks is necessary if you use a Vacuum Chamber Sealer.
Because heavy-duty commercial chamber sealers equalize the atmospheric pressure inside and outside the bag simultaneously, liquids never boil and they never get sucked out of the bag. You can seamlessly, flawlessly seal a bag of pure, sloshing water using the absolute cheapest, smoothest plastic bags on the market.
Ready to Ditch the Hacks Entirely?
If you process wet foods weekly or are serious about sous vide cooking, it is time to upgrade to the big leagues.
Read: Chamber Vacuum Sealer vs. External Suction (Is the Upgrade Worth It?)Discover how commercial technology handles pure liquids effortlessly and saves you massive money on bag costs over time.
Explore the Vacuum Sealing Hub
Don’t stop here! Dive deeper into the science of preservation, explore head-to-head machine comparisons, and read our latest hardware reviews for 2026.
FAQ: Vacuum Sealing Master Guide
2026 Edition: Wet Foods, Machine Performance & Food Safety
Pro Tip: If using an external sealer for liquids, pre-freeze the soup in a container for 2 hours until it is a “slush” before sealing!
Vacuum Sealing Excellence: The Definitive Guide (2026)