
Why Does My Vacuum Sealer Keep Losing Suction? (2026 Troubleshooting Guide)
It is a scenario every home chef dreads. You have a deep freezer full of bulk meat waiting to be processed, or a massive batch of meal-prep vegetables ready for the week. You meticulously line up your first bag, lock the lid, press the start button, and… absolutely nothing happens.
The motor hums loudly, roaring with effort, but the plastic bag just sits there, completely full of air. Or perhaps worse, it sucks some of the air out, but suddenly stops halfway through, leaving a loose, flimsy, heavily wrinkled package that is mathematically guaranteed to get severe freezer burn within a month.
A vacuum sealer losing suction is the absolute most infuriating roadblock in home food preservation. When this happens, most people immediately assume the internal motor is dead and angrily throw the $150 machine straight into the trash. Stop! Do not throw your appliance away. In 90% of cases, a vacuum sealer not sucking air is caused by a cheap $5 part that has worn out, or a simple, highly correctable user error. In this comprehensive diagnostic guide, we break down exactly why your machine is failing to pull a vacuum and how you can fix it in minutes with zero tools.
The Quick Answer
If your vacuum sealer motor is running but no air is leaving the bag, you almost certainly have compressed foam gaskets. When the gaskets flatten out from improper storage, outside air leaks into the vacuum channel, preventing suction. Other common culprits include liquid clogging the intake nozzle, inserting the bag too deep (blocking the air hole), or microscopic wrinkles breaking the seal. If the bag vacuums perfectly but immediately inflates when the lid opens, your Teflon heating tape is burnt and failing to melt the plastic closed.
For more advanced machine repairs and our complete library of food preservation guides, visit our master directory: Vacuum Sealing Excellence: The Definitive Guide for 2026.
1. The #1 Culprit: Compressed Foam Gaskets
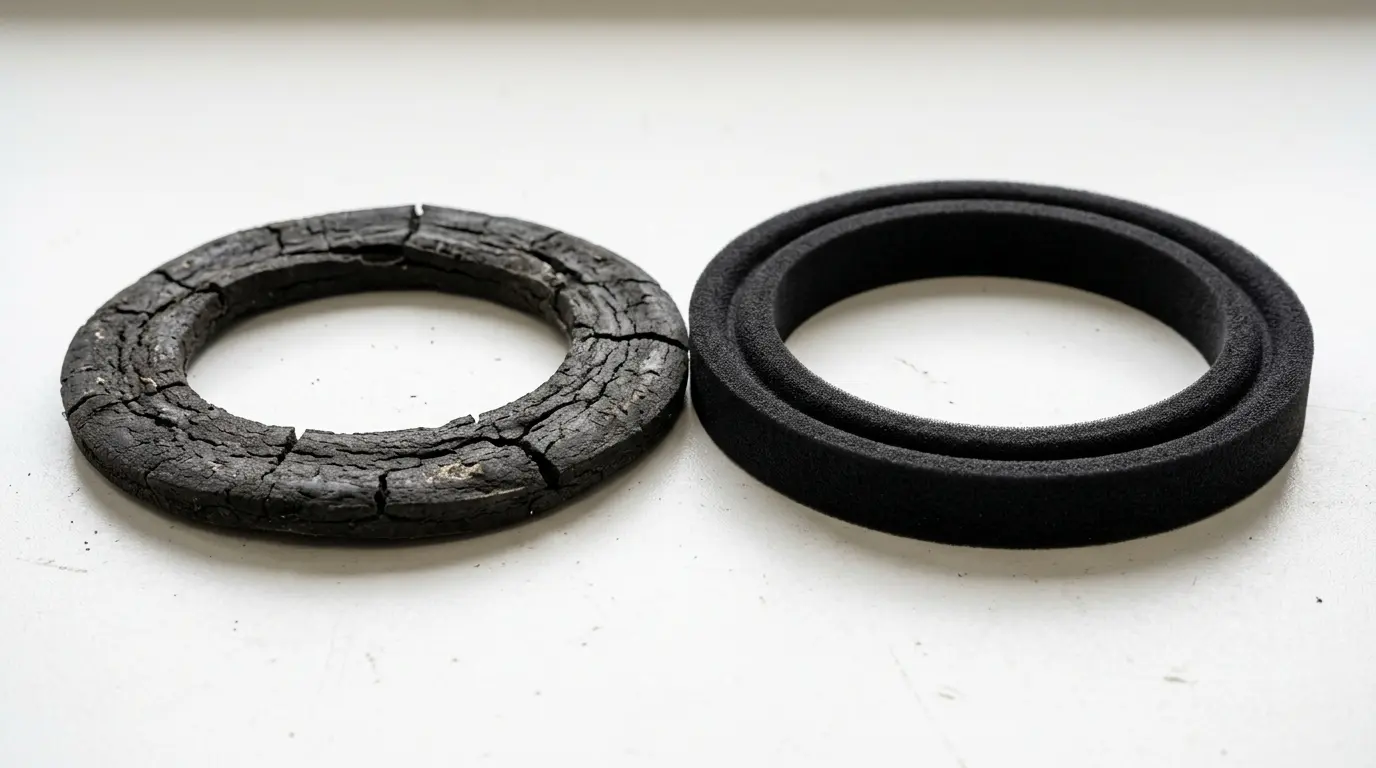
If your vacuum sealer turns on, the LED lights function perfectly, and the internal motor sounds perfectly normal, but absolutely no air is leaving the plastic bag, you almost certainly have a gasket problem. This is the single most common failure point across all external suction brands (including FoodSaver, Nesco, and NutriChef).
The Mechanics of the Gasket
Open your machine and look inside. Surrounding the “vacuum channel” (the drip trough where the open end of the bag sits), there are two distinct, oval-shaped black foam rings—one on the bottom base, and one mirrored on the top lid.
When you physically lock the machine closed, these two thick foam gaskets press tightly together to create an impenetrable, airtight seal around the plastic bag. If these foam gaskets become permanently compressed, hardened, brittle, or cracked, they can no longer form a perfect seal. Outside room air leaks directly into the channel. Because air takes the path of least resistance, the pump ends up happily sucking ambient air from your kitchen instead of pulling the trapped air from your bag.
The $5 Fix:
You do not need to buy a new machine! Order a fresh set of OEM or high-quality aftermarket foam gaskets online. You simply pull the old ones out with your bare fingers (they are friction-fit, not glued) and press the new, fluffy ones right into the tracks. For a full step-by-step visual tutorial on this repair, read Vacuum Sealer Not Sucking Air? The 5-Minute Foam Gasket Fix.
The Prevention (Operator Error):
Gaskets do not usually fail from old age; they fail from user error. Gaskets get permanently flattened because users snap their machines closed and lock the heavy side latches before putting the unit away in a kitchen drawer. Leaving the machine locked applies hundreds of pounds of pressure to the foam 24/7. You absolutely must read Stop Ruining Your Gaskets: The Only Correct Way to Store a Vacuum Sealer to prevent this $5 headache from happening again.
2. Liquid Clogging the Vacuum Channel
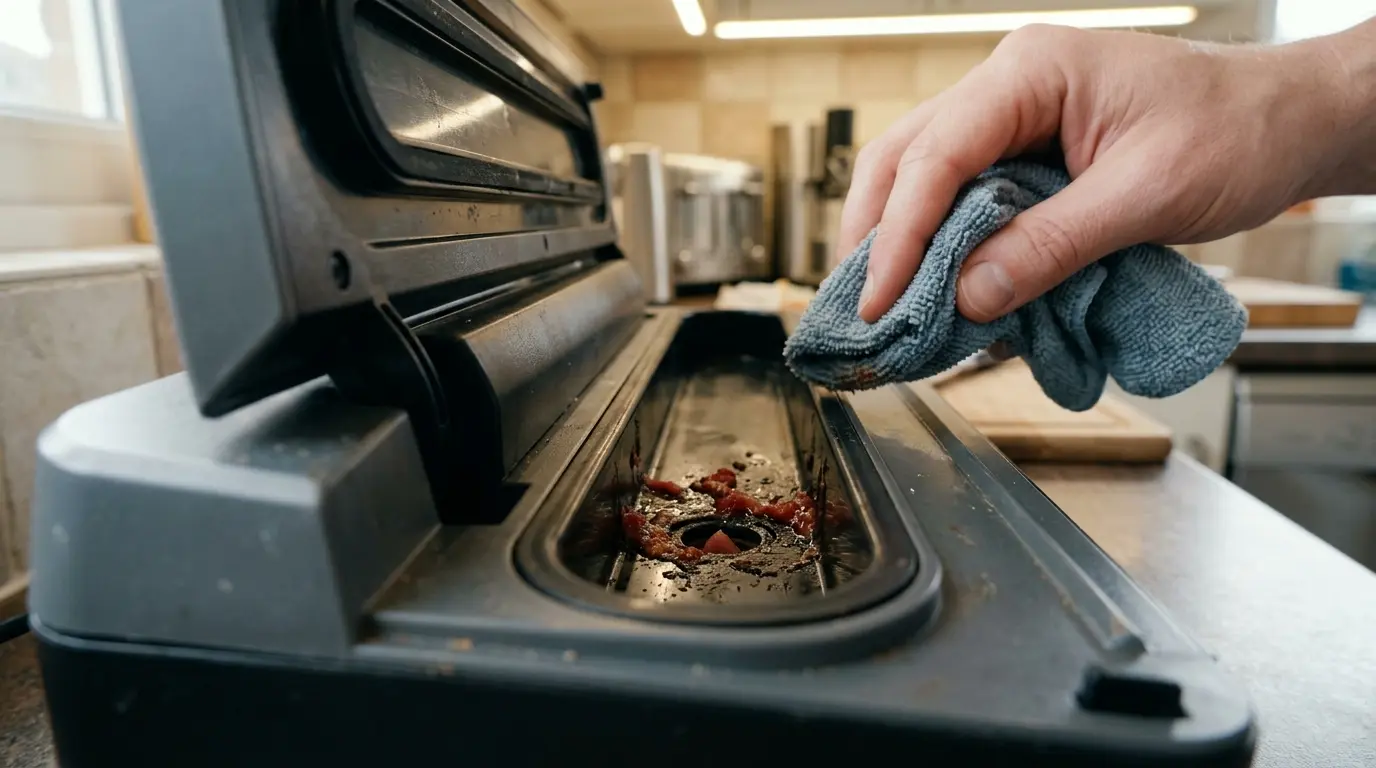
External suction machines act exactly like a household vacuum cleaner. If you were trying to seal a wet, soy-sauce marinade or a highly juicy cut of steak and you accidentally let the machine suck that liquid out of the bag, that liquid goes directly into the machine’s vacuum channel.
Inside that plastic trough, there is a tiny, microscopic intake nozzle that leads directly to the internal motor. If thick meat juices, sticky marinades, or soup coat the inside of this intake hole and dry overnight, it creates a physical, hardened blockage. The machine motor turns on, but it physically cannot pull air past the thick, sticky liquid plug.
Unplug the machine immediately. Remove the plastic drip tray (if your specific model features a removable one) and wash it in the sink. Take a warm, damp microfiber cloth and carefully, meticulously wipe out the entire vacuum channel, ensuring that the small circular intake hole on the side is completely clear of all sticky debris.
If you frequently process wet foods and are tired of scrubbing your machine, you must learn the “paper towel hack” outlined in our guide: Vacuum Sealer Not Sealing Wet Foods? Here’s the Fix to physically dam the liquid and stop it from ever reaching the motor.
3. Incorrect Bag Placement & Micro-Wrinkles
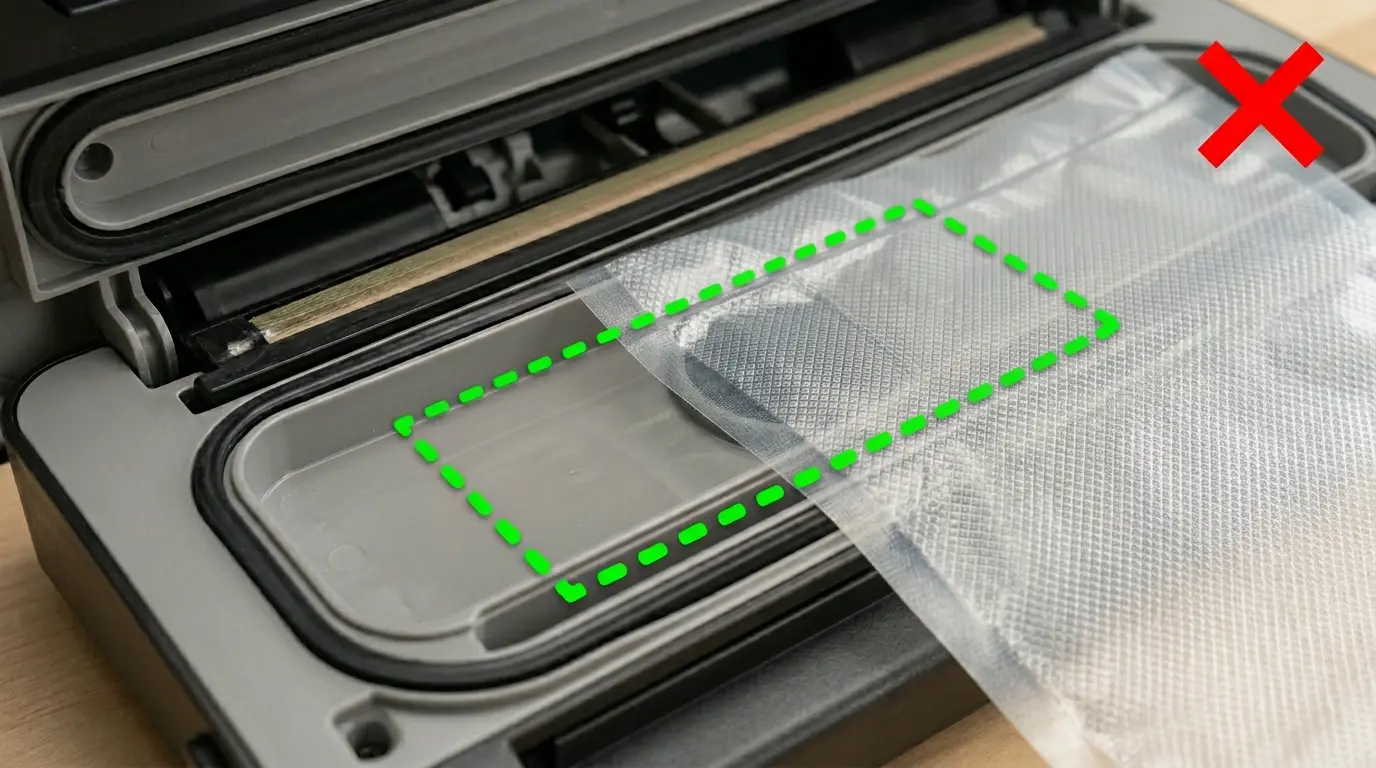
Sometimes, the appliance itself is in absolutely perfect, factory-new working order, but user error during the physical placement of the plastic bag is completely preventing the suction from occurring.
The Alignment Danger Zones:
- Inserted Too Deep: If you aggressively push the open edge of the bag too far into the machine, the plastic film will physically cover and block the tiny suction hole located inside the back wall of the vacuum channel. The machine will suck the plastic tightly against the hole, instantly blocking all airflow from the rest of the bag.
- Inserted Too Shallow: If the open edge of the bag doesn’t actually reach down into the recessed vacuum channel at all, it gets pinched tightly by the gaskets. The machine will just run indefinitely, sucking empty air from the channel while your bag remains fully inflated.
The Wrinkle Effect
If the bag is inserted at a slight, crooked angle, or if you are trying to stuff a massive roast into a bag that is too small, it creates a physical wrinkle across the plastic exactly where the foam gaskets clamp down.
A wrinkle is not just a cosmetic flaw; it acts as a microscopic, three-dimensional tunnel under the foam ring, allowing outside room air to continuously rush into the bag as fast as the machine can suck it out. If your bag looks crinkled, you will never achieve a vacuum. We cover this highly specific, maddening frustration deeply in Why is My Vacuum Sealer Leaving a Wrinkle in the Seal? (Easy Fix).
4. Worn Teflon Tape or Failing Heating Element

Here is a highly deceptive scenario: The machine actually does pull a flawless, rock-solid vacuum. The bag tightens beautifully around your food. But the exact second the machine beeps that it is finished and you pop open the lid, you hear a loud “whoosh” and the bag instantly reinflates with air.
In this case, the vacuum pump is perfect, but your thermal sealing element has failed. If the heating element fails to create a solid, continuous, melted line of plastic entirely across the width of the bag, the air rushes right back into the microscopic gap as soon as you release the pressure of the gaskets.
The Fix: Inspect the Tape
This failure is almost always caused by a burnt, scratched, or torn strip of brown, heat-resistant Teflon tape that covers the fragile heating wire. When the tape degrades, the bare wire either fails to heat the plastic evenly (under-sealing) or gets too hot and literally melts a hole completely through the bag.
Check your seal line. If it is broken, transparent, or melted straight through, you need to replace the $5 strip of tape. Learn how to peel it off and replace it in our DIY hardware guide: Why Your Vacuum Sealer is Melting the Bag (And How to Fix Teflon Tape).
(Note: If your bag holds a perfect seal initially on the counter, but you discover it inflated weeks later while sitting in the deep freeze, that is a completely different thermodynamic issue entirely. Read Why Do Vacuum Bags Lose Their Seal in the Freezer? 4 Culprits Explained to stop bone punctures and sublimation).
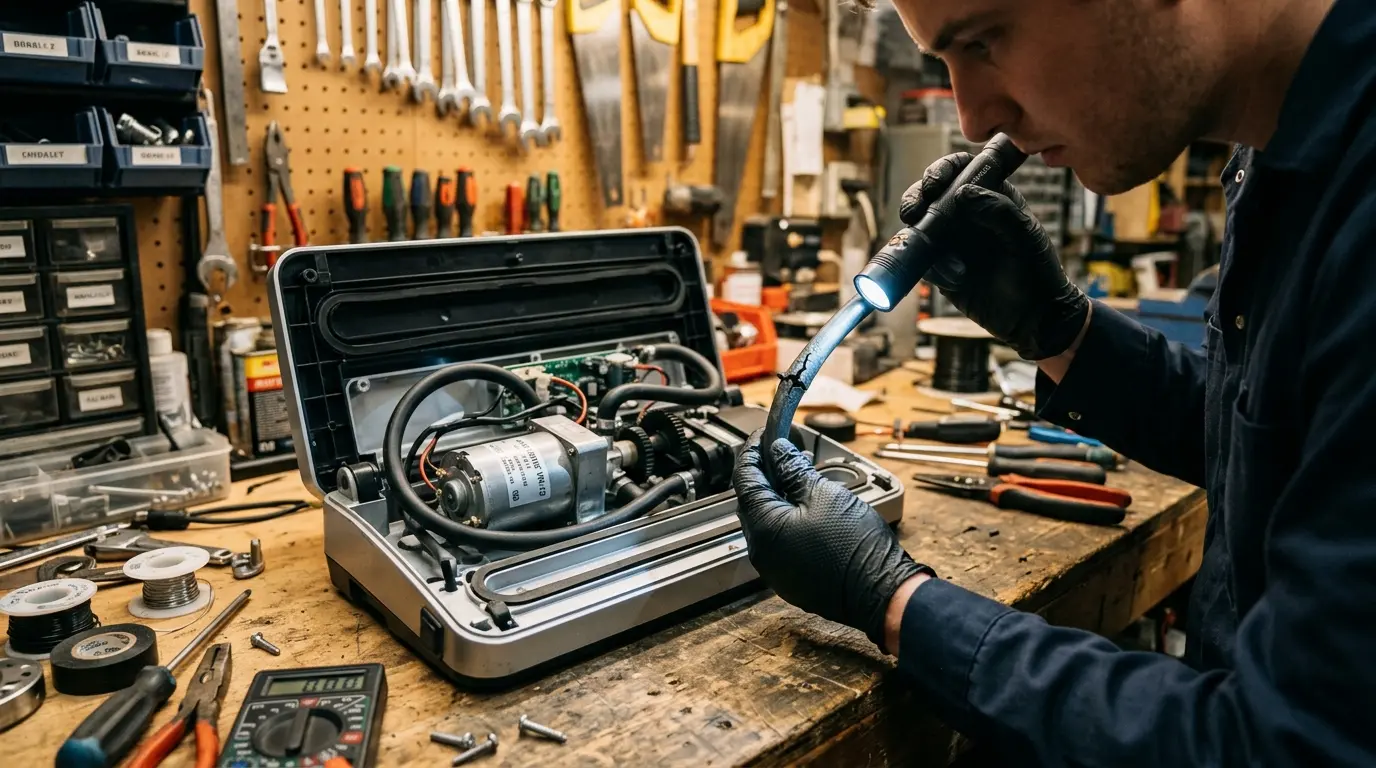
5. Internal Pump Failure (The End of the Road)
If you have meticulously replaced the foam gaskets, thoroughly cleaned the vacuum channel, positioned the bag perfectly flat, and verified the Teflon tape is pristine, but the machine still won’t suck air… you have exhausted the DIY fixes.
If the internal motor sounds like it is struggling, emits a weak, high-pitched whine instead of a robust, throaty hum, or smells like burning ozone, the internal vacuum pump has permanently failed.
This catastrophic failure usually happens to older machines, or to cheap budget models that have been severely overworked. Sealing 50 bags of meat in a row without allowing the motor proper cool-down times will trigger thermal overload and melt the pump’s internal plastic housing.
At this point, repairing the internal motor costs more than the appliance is worth, and the machine must be replaced. If you are tired of weak external suction and are ready for an appliance that can survive heavy, continuous processing, explore our definitive head-to-head architectural comparison: Chamber Vacuum Sealer vs. External Suction: Is the Upgrade Worth It? to find a commercial-grade machine built for heavy-duty use.
Explore the Vacuum Sealing Hub
Don’t stop here! Dive deeper into the science of preservation, explore machine maintenance hacks, and read our latest commercial hardware reviews for 2026.
FAQ: Vacuum Sealing Master Guide
2026 Edition: Brands, Maintenance, Safety & Culinary Science
Pro Tip: If you seal a lot of wet foods, place a folded paper towel inside the bag between the food and the seal line. It acts as a final barrier to catch stray juices!
Vacuum Sealer Not Sealing Wet Foods? Full Fix Guide