
How Long Does Vacuum Sealed Meat Last in the Freezer? (2026 Preservation Guide)
Meat is undeniably the most expensive item on any modern grocery receipt. Whether you are stocking up on premium prime ribeyes during a massive holiday sale, buying bulk chicken breasts from a warehouse club, or processing hundreds of pounds of wild game after a successful autumn hunting trip, your deep freezer is your ultimate culinary vault.
However, if you are wrapping that expensive, high-quality meat in standard butcher paper, cheap plastic wrap, or casually tossing it into an ordinary zipper freezer bag, you are putting a strict, unforgiving ticking clock on its lifespan. Within just a few short months, the cold, arid air of the freezer will violently ravage the muscle tissue, leaving you with gray, tasteless, leather-like cuts of freezer-burned meat that belong directly in the trash.
The ultimate, scientifically proven solution is vacuum sealing. By physically extracting 100% of the ambient oxygen from the heavy-duty packaging, you instantly halt the chemical degradation processes that destroy food. But exactly how much time does this buy you? In this comprehensive guide, we break down the physics of freezer burn, provide exact shelf-life timelines for various proteins, and reveal the professional processing secrets you need to know. For a complete overview of all our preservation resources, be sure to visit the Ultimate Guide to Vacuum Sealing.
The Quick Answer
When properly vacuum sealed and stored in a consistent deep freeze (at or below 0°F / -18°C), raw beef, poultry, and pork can last 2 to 3 years without any noticeable loss in flavor or texture. Ground meats and fatty fish will remain pristine for 1 to 2 years. This is a massive 500% increase over standard zipper freezer bags, which generally allow meat to suffer from severe freezer burn and oxidation within just 4 to 6 months.
I. The Science of Freezer Burn (Why Standard Bags Fail)
To truly understand why a $150 vacuum sealer is worth its weight in gold, you must first understand the invisible enemy actively destroying your food: Freezer Burn.
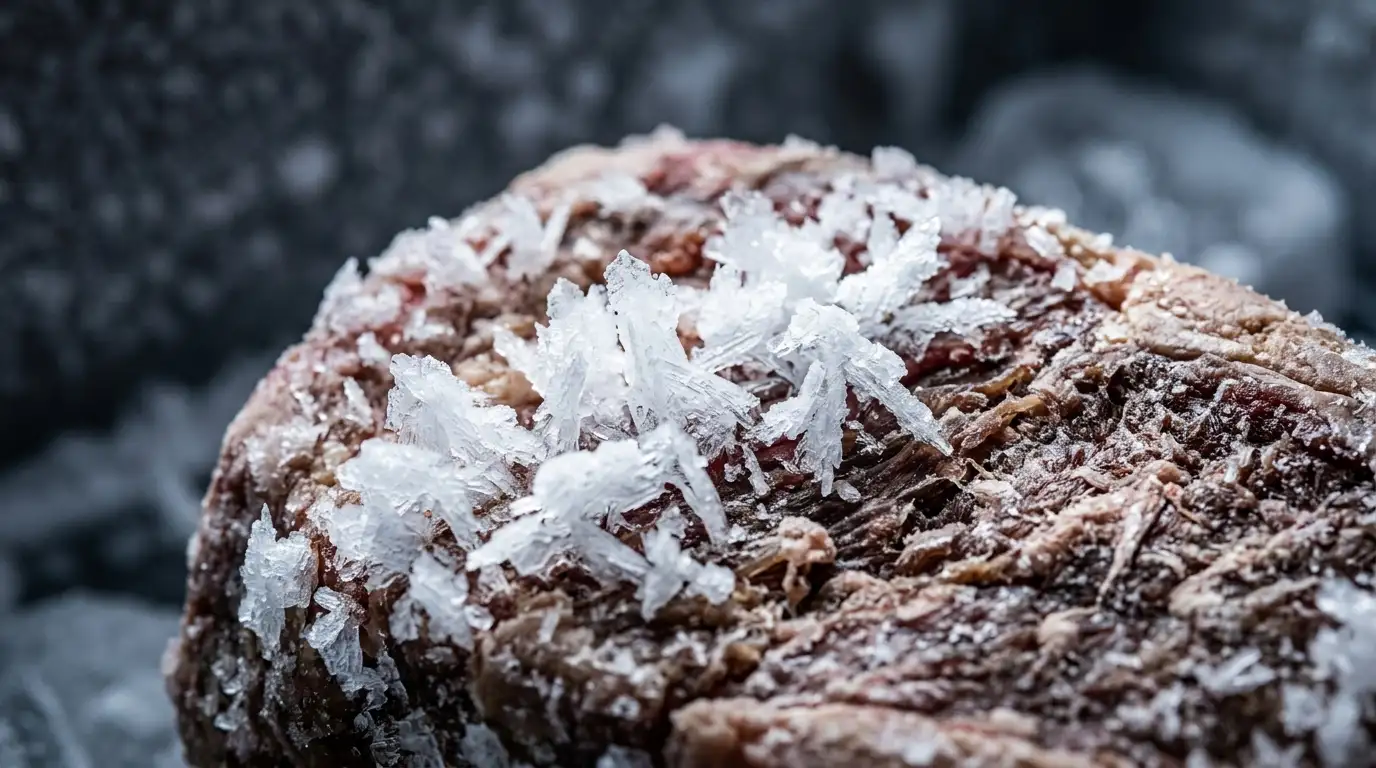
Freezer burn is not actually a “burn” at all; it is a state of extreme, localized dehydration. The ambient air circulating inside a standard kitchen freezer is incredibly dry. When raw meat is stored in a standard Ziploc bag or wrapped in butcher paper, there is always residual ambient air trapped inside the packaging, resting directly against the surface of the protein.
Over time, the moisture locked inside the meat undergoes sublimation—a phase transition where solid ice turns directly into water vapor without ever becoming a liquid. This vapor is drawn out of the meat into the trapped air pocket, forming a thick layer of ice crystals on the exterior. The meat left behind becomes irreversibly dehydrated, tough, and fibrous.
Simultaneously, the oxygen trapped in the bag constantly reacts with the delicate fat molecules (lipids) in the meat. This process, known as oxidation, causes the fat to turn a dull, unappetizing brown or gray, and eventually makes the meat taste distinctly rancid and metallic.
The Permeability Flaw
Standard zip-top freezer bags are made of Low-Density Polyethylene (LDPE). At a microscopic level, this cheap plastic is actually highly porous and permeable to oxygen. Even if you squeeze all the air out perfectly, oxygen will slowly bleed right through the plastic wall over several months.
This is exactly why we so strongly recommend reading our deep dive on Vacuum Sealer Bags vs Freezer Bags: Is It Worth It?. A true, multi-layer vacuum sealer bag features a thick nylon barrier. It extracts 100% of the air and creates an impenetrable, oxygen-proof fortress that stops sublimation and oxidation dead in their tracks.
II. Shelf Life Comparison: Standard vs. Vacuum Sealed
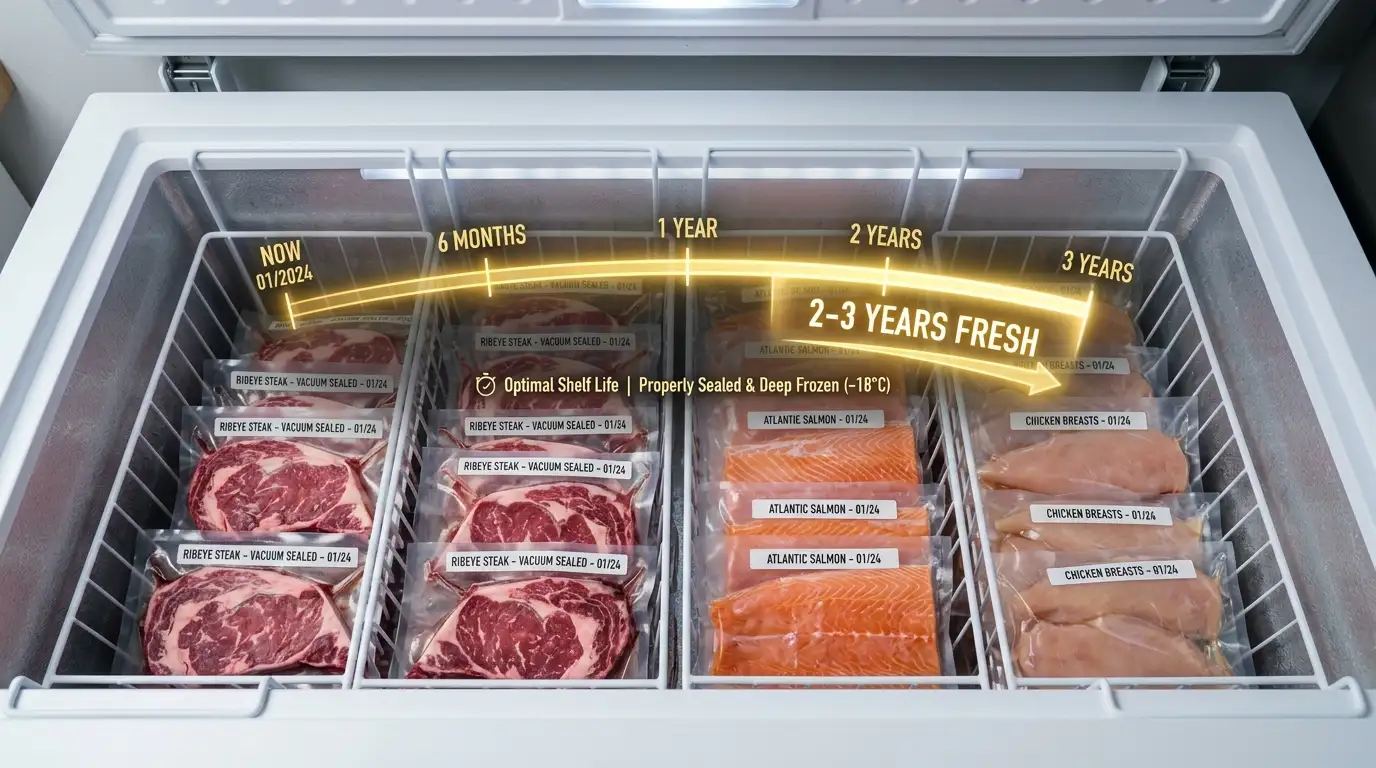
The difference in maximum edible shelf life between traditional freezing methods and high-barrier vacuum sealing is absolutely staggering. When properly sealed in a premium, BPA-free bag and stored in an undisturbed chest freezer, you can expect the following timelines before the flavor or texture begins to degrade.
| Protein Type | Standard Ziploc / Butcher Paper | Vacuum Sealed (0°F) |
|---|---|---|
| Steaks & Roasts (Beef) | 4 to 6 Months | 2 to 3 Years |
| Whole Poultry (Chicken/Turkey) | 6 Months | 2 to 3 Years |
| Pork Chops & Tenderloins | 4 to 6 Months | 2 to 3 Years |
| Ground Meats & Sausage | 3 to 4 Months | 1 to 1.5 Years |
| Fatty Fish (Salmon, Tuna) | 2 to 3 Months | 1 to 2 Years |
A Note for Hunters & Anglers:
When dealing with massive yields from a successful elk or deer hunt, traditional wrapping methods simply cannot compete with the sheer preservation power of an airtight weld. Wild game has incredibly low fat content, making it highly susceptible to rapid freezer burn.
Check out our definitive technical guide on Vacuum Sealing vs. Butcher Paper for Venison for a detailed breakdown of how to process your harvest for multi-year storage.
III. Factors That Will Ruin Your Meat’s Shelf Life
Even if you purchase the absolute best, most expensive vacuum sealer on the market, human error during the packaging phase can drastically reduce how long your meat lasts. If you pull a bag from the deep freezer after six months and find it inexplicably bloated and filled with air, one of these three critical issues is almost certainly the culprit:
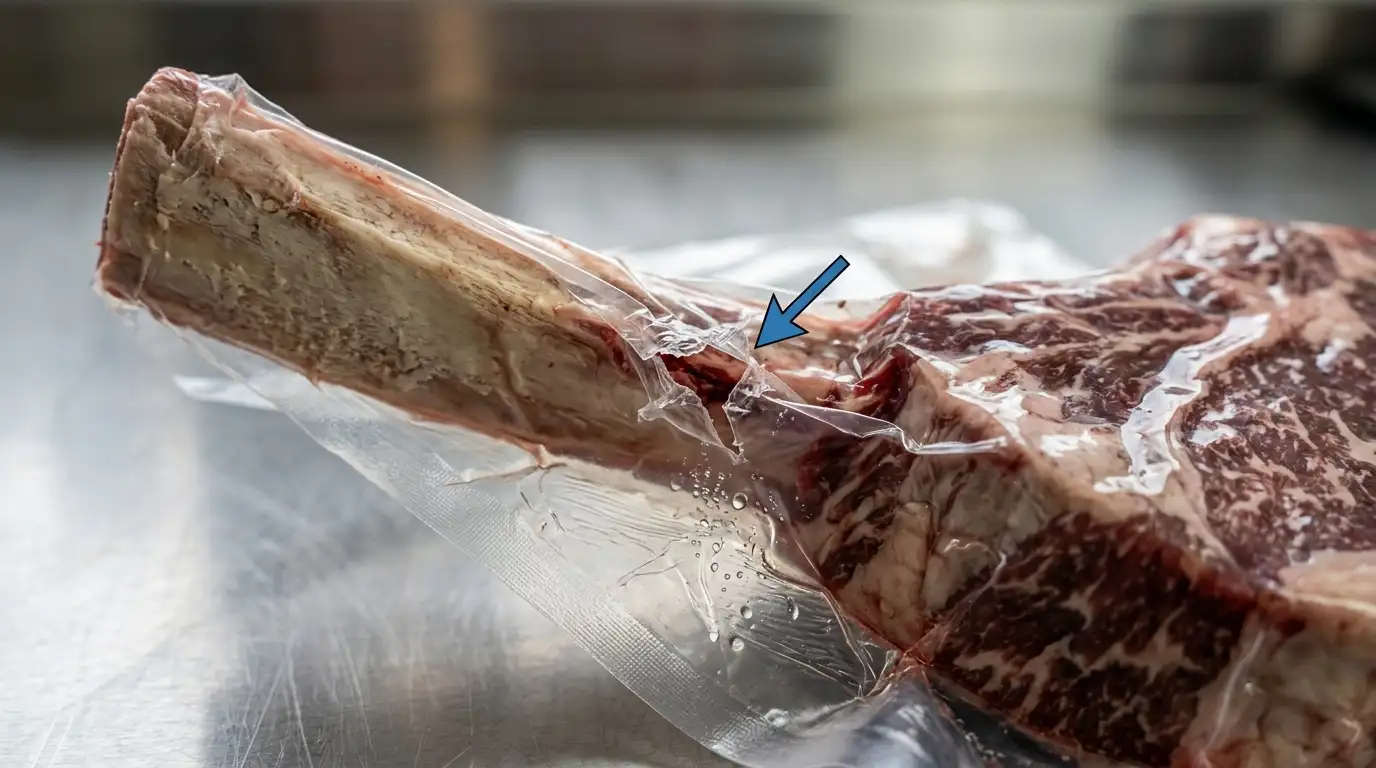
1. Bone Punctures (The Invisible Leak)
This is the undisputed #1 killer of vacuum seals. As the machine powerfully sucks the air out of the bag, the thick plastic is pulled violently tight against the meat. The sharp, jagged edges of a T-bone steak, a bone-in pork chop, or a rack of ribs will easily pierce microscopic pinholes right through the plastic wall.
You won’t notice the leak immediately, but over weeks in the freezer, the vacuum will be entirely lost. You absolutely must learn How to Vacuum Seal Bone-In Meat Perfectly using professional bone-guard tape or folded parchment paper to protect the structural integrity of the bag.
2. Liquid in the Seal Line
When sealing a highly juicy steak or a piece of chicken sitting in a wet marinade, the aggressive suction of a standard external sealer will forcefully drag those liquids up the bag and directly into the heating element.
If blood, water, or oil gets trapped exactly where the machine is trying to melt the plastic together, the bag will not fuse correctly. The weld will be weak, leaving a microscopic gap where air will eventually leak back in. (See Section IV for the ultimate hack to fix this).
3. Extreme Temperature Fluctuations
Storing your vacuum-sealed Wagyu steaks in the swinging door of your kitchen refrigerator is a massive mistake. The kitchen freezer is constantly opened and closed, exposing the meat to daily blasts of warm room air.
Furthermore, standard kitchen freezers feature “Auto-Defrost” cycles that intentionally heat the interior walls to melt frost, constantly thawing and re-freezing the microscopic edges of your meat.
For reliable, long-term, multi-year storage, meat should be kept in a dedicated, deep Chest Freezer that does not auto-defrost and remains permanently closed at a rock-solid 0°F.
If your bags are still failing despite avoiding these mistakes, consult our full diagnostic breakdown: Why Do Vacuum Bags Lose Their Seal in the Freezer? 4 Culprits Explained.
IV. Pro Tips for Maximizing Meat Preservation
To guarantee that your massive brisket tastes just as impeccably fresh on day 700 as it did on day 1, incorporate these three industry-standard butcher practices into your home workflow.
1. Pre-Freeze Wet Meats (Or Use Liquid-Block Bags)
To prevent the “liquid in the seal line” failure mentioned above, you must manage the moisture before you hit the vacuum button.
- The Hack: If your meat is incredibly juicy, place the raw cuts on a baking sheet and put them in the freezer, completely unsealed, for 1 to 2 hours. This slightly hardens and freezes the exterior liquids, preventing your machine from sucking wet juices into the seal line.
- The Premium Solution: Alternatively, you can save time by purchasing specialized bags lined with internal absorbent strips designed to catch rogue liquids before they hit the weld. We review the best options in our Best Vacuum Sealer Bags for Wet Food guide.
2. The “Flat-Pack” Technique
When vacuum sealing ground beef, venison, or turkey, never freeze it in a massive, thick ball or cylinder. Always press the ground meat entirely flat inside the bag (about 1 inch thick) before sealing it.
Flat-packing serves two brilliant purposes: it stacks beautifully like books, saving massive amounts of physical space in your chest freezer, and it allows the meat to freeze incredibly fast. The faster meat freezes, the smaller the internal ice crystals are, which prevents the cellular walls of the meat from bursting and leaking flavor.
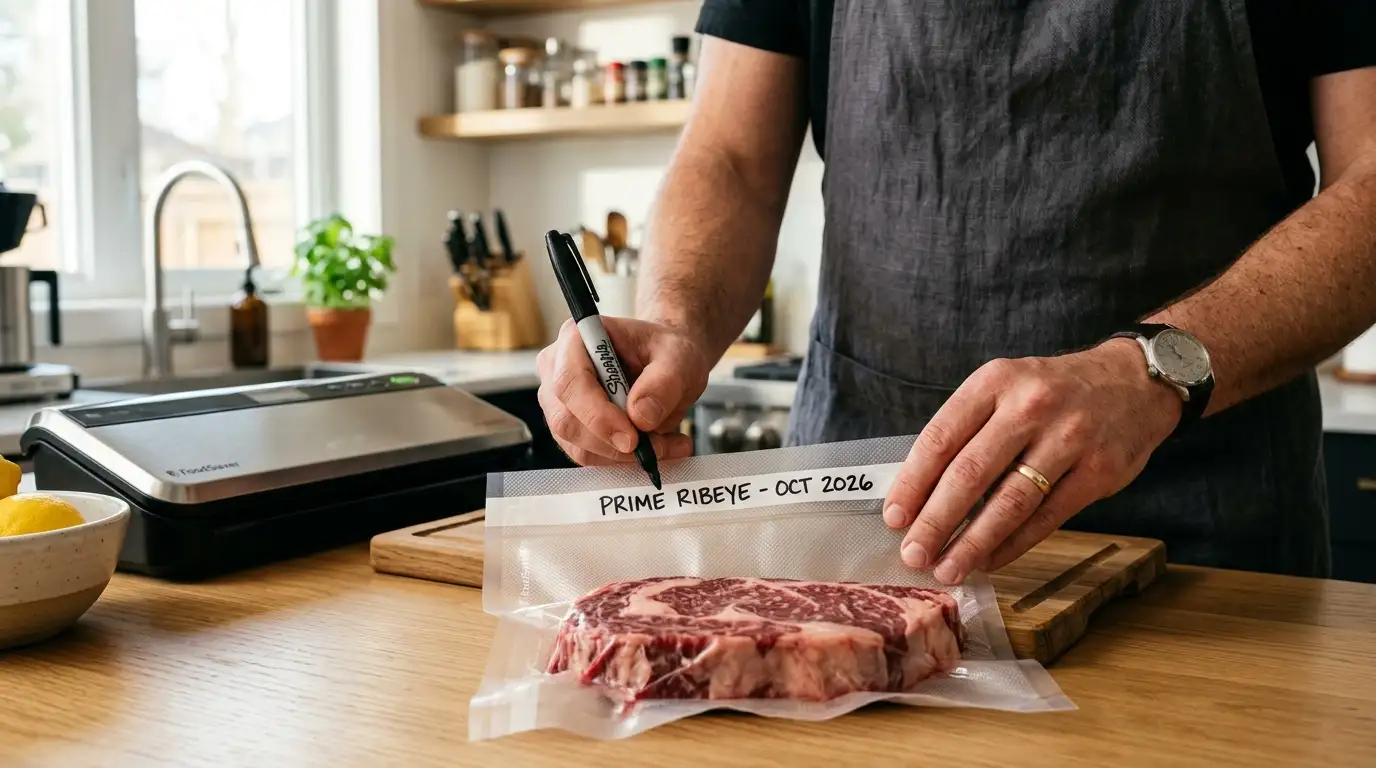
3. Label Absolutely Everything
A vacuum-sealed, frozen chicken breast looks remarkably, frustratingly similar to a frozen pork chop when covered in a thin layer of frost 14 months from now. Use a heavy-duty permanent marker to write the exact date, the specific cut of meat, and the weight directly on the textured side of the plastic bag before you put the raw meat inside. Good inventory management prevents waste.
Are You Processing Heavy Volumes?
If you process hundreds of pounds of meat regularly, standard $100 suction sealers will inevitably overheat and burn out. It is time to consider the professional leap.
Read: Chamber Vacuum Sealer vs. External SuctionSee how commercial chamber technology manipulates atmospheric pressure to handle wet foods and massive batches effortlessly.
Explore the Vacuum Sealing Hub
Don’t stop here! Dive deeper into the science of preservation, explore bag comparisons, and read our latest commercial hardware reviews for 2026.
FAQ: Freezing Vacuum Sealed Meat
2026 Guide: Color Changes, Thawing Safety, and Bag Failures
Freezer Tip: Always pat your meat bone-dry with paper towels before sealing. Excess surface moisture is the #1 reason seals fail in the deep freeze!
Vacuum Sealing Excellence: The Definitive Guide (2026)